Wall hanging

I live in a studio alcove.  I have it set up so the bedroom is a separate area, with the back of my dresser facing my living room area.  When I moved in, my parents told me I should make something to cover it.  Now, over 18 months later, I have finally bothered to start something.

I bought myself a pretty kit that looks like Tiffany stained glass of pink dogwood blossoms on a green background.  I decided I need to practice my hand quilting stitches, and something for my own apartment (not a gift) is the perfect medium for that because I don’t have worry about messing up on someone else’s present.

I sewed the kit together per the instructions, but adding two strands of ribbon that I’ll use to hang it.  (I will probably end up knotting the ribbon to make it a little shorter.)  Then I pinned the kit all over and began the quilting.  I had intended to begin on the trip to Spry’s wedding, but I forgot sewing needles.  I had to wait until we got there to buy needles somewhere and then I was able to start.

I have a book of quilting stitches, which I used.  I picked some simpler ones and practiced on a piece of scrap paper.  I started with a stem stitch.  I sewed all the way around the whole edge of the outer pink border with a stem stitch.

Close up of the stem stitch – sorry it’s blurry

I’m in the process of highlighting the petals of one of the blossoms with a cable stitch.

The back – sorry if the stitches don’t show up well (and sorry the pictures are so blurry).

My book is called “The Quilter’s Stitch Bible.”  Sometimes I find the instructions a little confusing, but for the simpler stitches – with practice – I usually manage to work it out.

the page on stem stitching from my book

the page on cable stitches

Eventually I’ll finish it and hang it up and I suppose I’ll have to post another picture then.  I haven’t finished the quilting – the flower isn’t actually done, and I would like to do something on the inner pink border, and maybe a second flower.
Fixing skirts

I have an annoying problem that is probably annoying for other people to hear about, which is that I have lost several pounds over the last several years and now some of my clothes are too loose.  It bothers me because I feel like it looks unprofessional, but I don’t want to spend a lot of money to have everything taken in, and I don’t necessarily have the skill to take things in myself.  I have been meaning to start going through my wardrobe for some time now, and finally one day I decided to start small, with a couple of skirts that would be easy to do.

The skirts are identical, but different colors.  They were sitting lower on my hips than they should have, which meant they felt below my knees (and made me look stumpy!).  Also, again, I don’t like my clothes to be loose in the waist or chest.

before shot – note how low the skirt sits

there’s a ton of room in the waist

The skirts are pleated and lined.  They have side zippers, so I took them in on the opposite side.  With one skirt, I pinned everything from the inside and just sewed, so the pleats don’t match up perfectly.  With the other skirt, I took in the lining and then took in the top, matching up the pleats.  That’s the blue skirt – I had blue thread that matched and I could sew the pleats on the outside of the skirt.  I apparently don’t own taupe thread, so the taupe skirt had to be sewn on the wrong side only, making matching up the pleats a complicated endeavor and one I kind of failed at.  (Also, I did the taupe one first so that was more trial and error.)  Since no one at work looks that closely at my clothing, no one will notice.  I will say that the taupe one is a bit more fitted than the blue skirt, although the blue skirt looks better.  Below see blurry photos of the process and results:

The pleats have been pinned.

This shot sort of shows how much I took in.

You can see how messy the seam is at the top, where it’s all bunched.

Success! It’s messy, but the skirt now sits just below my navel.

This shows how much of the blue I took in – also, I think you can see that it’s neater than the taupe.

Final shot of the finished blue skirt

I didn’t cut out the extra fabric because that seemed unnecessary.  The skirts are pretty full so it’s not like they’re bunchy.  I think I’ve worn at least one of them since then.  I’ll wear them more in the fall.

spry: pintucking the “designer” way

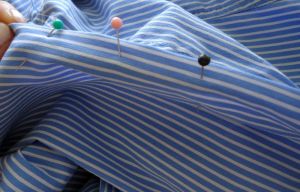
Adding pintucks seemed like a cute way to make a slightly large shirt smaller around, compared to augmenting the tucks in the back or just sewing up the sides, so I challenged myself to sew straight lines.

Luckily the shirt in question is striped.

I few weeks ago I shortened a skirt with polkadots and thought I wouldn’t need to actually mark the line I wanted to cut along, because I could connect the dots. It didn’t work that way… so, yay straight lines!

I’d read a how-to pintuck a year or so ago somewhere and didn’t bother to brush up before I started the project. It’s pretty straight forward. Just decide where you want the tuck, fold the shirt along that line, pin it (even with straight lines, one gets cross-eyed), and then sew. (I bet you’re really supposed to iron the crease straight, except I would be liable to iron a giant wrinkle, so I did not bother.) I placed the needle as close to the edge as possible. It took a few lines to internalize how slowly I had to sew to actually sew a straight line. But that’s just me.

Also, it’s much easier to sew on along the edge of a colored stripe than a white one [with white thread] because I kept losing track of where I was sewing, until I waved into a colored stripe, of course.

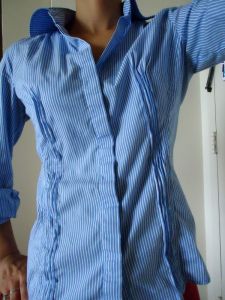
I placed the tucks starting at where the chest-tuck ends to the bottom of the shirt. I put the shirt on after every line to see how the shirt was shrinking. It is not a drastic change.

I had a system of counting lines after the tuck to place the next line. I did three lines on the right-side of the shirt, then decided that I should see how narrow the shirt would be with three lines on the left before adding more.

So I sewed three lines down the left, with my trusty line-counting system.

Of course I did something wrong. The lines on the left came out much closer together than the ones on the right. OF COURSE.

(I think I hadn’t accounted that, for the right side [as in the photo] I was sewing new tucks with the old ones visible. To start at the top of the line on the left side, I was sewing with the old tucks on the underside, and should have counted more lines between tucks, the way I was folding them down. If that makes sense.)

Faced with the dilemma of “equal number of tucks but unequal width of pintucked shirt space” v “unequal number of tucks but equal width of pintucked shirt space,” after brief deliberation I chose the latter. The shirt looked really lopsided with the well-spaced tucks on one side and the bunched-together tucks on the other. And there was no way I was going to rip out all of those lines to redo them.

The size, at least, is now just right.

Since the shirt is so stripy, the tucks actually are more subtle than they would be on a non-striped shirt. Soooo can’t really tell that there are 5 lines down one side and just 3 down the other.

Right?

Well, if you can tell, I’ll just say it’s “designer.”