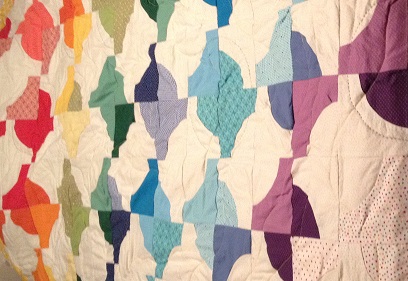
Handstitched Quilt Update

Hi habibis!  Here’s my update, a little delayed.

I’ve made more progress!  But it’s slow progress…

I’ve finished all the Storm at Sea subunits. Now I need to go back to the class instructions to refresh my memory on how to join them into the full-sized blocks and then I can actually put this border together!  The next border is more fusible applique, which I already know how to do, so from here on out the assembly should go quickly as long as I can spare the time for it.  April is already flying!

Handstitched Quilt Update

Hi habibis!  Happy Easter and happy Passover, if you celebrate them!

I’m a good six weeks (two months?) behind on this quilt – too many other projects keep getting in the way.   I can’t prioritize sewing for myself over sewing for others.  We were supposed to be finished in the next week or so, but I’m still stuck in the English paper piecing stage.  Here’s my progress so far:

So that’s about it. Who knows when I’ll finish the quilt…

Blog tags

I want to make the blog more reader-friendly, and I realized that tags are a good way to do this.  I’ve gone through all of my posts and added tags based on various themes. I’ll tag this post with all of them so you can more easily find anything you’re interested in, and my goal is to be more conscientious about tagging in the future.

In the course of doing all my tags, I realized that I posted twice about the Storm at Sea runner I made my parents, once in 2011 and again last December during my Advent posts.  Perhaps if I’d had a better tagging system I would have remembered that I’d done it before!  It was fun to go back and look at the old posts – I’d forgotten what some of the blocks were called and I had to read the posts to see which quilt I was writing about.  Most of my pre-blog quilts are on here, although I know of at least four that aren’t.  Perhaps those will be fodder for Advent 2014!

The tags fall into several categories: block type, type of item if it’s not a quilt, language if I was quilting in something other than English, etc.   The blocks I have thus far are as follows:

Drunkard’s Path – Storm at Sea – Hunter’s Star – Lone Star – hexagons – pinwheels – Steps to the Altar – Rail Fence -Windowpane – Log Cabin – “Elegance” fan block – Korean patchwork – Amish Square – Bow Tie block

If you happen to notice that I have the wrong name for a block or if there’s another name for it, please let me know!  In one case – the wedding quilt I made for my friend N last year – I’m not sure if there is a name for this kind of quilt.  (https://habibihomemade.wordpress.com/2013/07/16/wedding-quilt-for-n-and-a-part-i/)  If there is a name, please share it with me.

I made a tag for doll quilts, since I make so many of them, and if I used a particular block I tagged that as well.  I may have missed some, so leave a comment if you notice that a block went untagged.

Tags for non-quilts include, in no particular order: pot holders; kitchen/household; holiday; decor; pillows; napkins; clothing; ornaments; aprons.

I’d forgotten how many pillows I’d made, for example.  Kitchen/household covers pot holders, napkins, and aprons; aprons fall under clothing, too.  Decor includes pillows, runners, and wall hangings, but runners and wall hangings don’t have separate tags.  Holiday includes ornaments and stockings, the latter of which also don’t have a separate tag.  If you think it would be helpful for me to make a runners tag or a wall hangings tag or a stockings tag, let me know.  If you see anything I haven’t tagged that you think I should – a quilting design or a specific stitch or whatever – just leave me a comment.

Hopefully this way my blog will be much easier to navigate.  I like to read other quilters’ blogs and I’ve learned not just from what other people are making but from how they’re blogging about it.  Tagging struck me as a relatively easy way to be more accessible.  This is for you, so feel free to give me your input.  If you want a “wedding” tag or a “birthday” tag or some other category that you think would be useful, I want to know about it.

Enjoy!

Runner for my parents – Updated

Happy third week of Advent!  Today is Gaudete Sunday.  Gaudete is Latin for “Rejoice!”   If you have an Advent wreath, which the Catholic Church uses to mark the passage of the Advent season, the first two and the fourth weeks are purple candles, but the third week is a pink candle.  Purple is for waiting but pink is for joy.  Let’s be joyful this week!

Here’s the long-overdue post featuring the non-Christmas runner I made for my parents.  (Rejoice!  I’ve finally posted.  I say non-Christmas runner because I’ve made two Christmas runners for my mother, as well.)  I made it a few years ago, at my mother’s request.  She consulted with the fabric choices to match her living room decor, but she said I could pick the pattern.

Funnily enough, and I had forgotten about this, I picked the Storms at Sea pattern, the same one I used for Z’s quilt.  The “Quilt-Lovers’ Favorites” book offers variations of the same pattern as a wall quilt and a table runner, and I followed the table runner directions, more or less.  I made it longer and I did a different border.

Here’s the top:

I used squares for the border, rather than a solid border.  As you can see, I used neutral prints to match my parents’ living room – I have golds and browns and beiges.

Here’s the back:

For the quilting, I did champagne bubbles.  Champagne bubbles means quilting circles, basically.  I traced a glass on one of those cardstock mailers and then I traced around that.  I tried to center the circles at the intersections of seams.  They overlapped slightly.

I used gold thread.  It shows up really nicely on the back.

They aren’t perfect circles, of course – I’m working on that.  My mom likes the runner and she uses it most months of the year.

UPDATE: If you feel like you’ve seen this before, you very well may have.  I posted about it back in 2011, but I forgot.  I only figured out the duplication when I started tagging all of my posts.  Oops!  If you haven’t seen the first post and you’re curious, here’s the link: https://habibihomemade.wordpress.com/2011/08/17/rozsamarias-quilted-table-runner/

Quilt for Z – Part VII

I just wanted to post some full pictures of the quilt.  I love how it came out, despite the hiccups with the curved quilting.  (I have to practice somewhere – Z won’t mind if it’s on a gift for him.)

IMG_1246


I took a washcloth and rubbed off as much of the remaining pencil markings as I could.

Here’s the back:

IMG_1252


I made a nice quilt tag for Z and hand sewed it to the back.  It’s beautiful, isn’t it?  It only took me three months.  I’m so happy with it.

Quilt for Z – Part VI

I wanted to do some machine quilting on the Storms at Sea quilt blocks to hold the center of the quilt together better.  I wasn’t sure the 16 stars would be sufficient.

I decided to quilt on the diamonds.  I thought I would do a lens shape. (I had to Google it to figure out what the shape is called, and per Wikipedia it’s called a “lens.” https://en.wikipedia.org/wiki/Lens_(geometry))  I used my template plastic again.  I figured if I were going to do the diamonds, I should do the little squares, too.

IMG_1191

IMG_1166

I quilted the lens shapes in the royal blue thread I’d used elsewhere.  I quilted them so that the lens shapes overlapped on the red squares.IMG_1212 cropped

IMG_1164


It doesn’t really show up on the back, because I used the blue thread.  (By contrast, the quilting on the borders shows up really well.)

IMG_1207

So here is what I have learned from all of my machine quilting of curved lines on this quilt: I can do it, but I struggle when it requires tight curves.  The design that came out best was the design on the outermost border, which had larger curves and then corners.  Everything else I did had tighter curves in shorter distances, and I struggled.  In a lot of places it looks kind of messy.  In the future, I won’t choose curved designs where I have to maneuver the quilt a lot in a short distance.  Also, having a lot of seams messed me up in some places.  Lessons learned!

Quilt for Z – Part V

More quilting!

I still had blank spaces on the inner blue border.  I had originally intended to quilt waves in that space, to match my nautical theme.  There’s a nice wave pattern in my hand-quilting motifs, and I was going to quilt the waves with the same royal blue thread I’d used on the stars on the red squares, with maybe white thread to make the caps of the waves.  (Fancy, right?)

However, I thought about it, and I thought I would end up having waves going in different directions on the quilt, which I didn’t want.  I wanted everything to be symmetrical.  So, I decided against the waves.  It might have been TOO thematic, anyway.

I had wanted something with sashiko.  I thought the waves would look nice with sashiko quilting, but once I decided against the waves I still wanted to stick with sashiko.  I mulled over different geometric designs and patterns.  I thought I would do something similar to what I did on the baby quilt for my friend N’s son, with the crisscrossing lines.  (https://habibihomemade.wordpress.com/2013/05/04/baby-quilt-for-my-friend-n/)

When I started to trace it out on the border, I realized the border was too narrow.  Instead of doing the whole border, I traced an inch at the center of the border, going around the corner, with crisscrossing lines at one-inch intervals.

IMG_1193 IMG_1194 IMG_1192

I tried quilting it with the royal blue thread, and there wasn’t enough contrast.

IMG_1195

I took the thread out and started over with white thread instead.

IMG_1201

I learned, in the course of doing this, that the borders weren’t all even in length.  I don’t think Z will mind.

IMG_1208

I left a space open when I went around the corner to make a pretty design:

IMG_1200

IMG_1212
It looks really cool, doesn’t it?

Pictures of it from the back
IMG_1206 IMG_1205

This hand quilting is actually the last piece of quilting I did on the quilt.  All that’s left is the quilt tag.  However, I haven’t posted about the last machine quilting I did, so I’ll post about that tomorrow.

Quilt for Z – Part IV

More stars!

As I mentioned yesterday, I decided to quilt 50 stars on Z’s quilt.  I quilted sixteen of them on the large red squares in the Storms at Sea blocks, and the rest went on the blue border, which I posted about yesterday.

Just like the other stars, I traced my star template onto each red square.
IMG_1173

I started to quilt the stars in white thread, like I did on the blue border, but the white thread blended into the red and white prints in the squares. I switched to a royal blue thread instead:

IMG_1172

IMG_1181

I think it’s hard to see the stars in the second picture, but each large square has a star quilted in the center.

These stars don’t show up on the back, because the thread blends in:

IMG_1179 IMG_1180


(P.S.  It really bothers me that my pictures aren’t coming out true to color, but that’s the issue with phone pictures, I guess.)

Here’s pictures of the border.  You can see that the corners are still blank:

IMG_1184 IMG_1163 IMG_1165

Tomorrow: quilting the rest of the inner border!

Quilt for Z – Part III

More quilting!

I decided to quilt fifty stars on the quilt, for the fifty states and the fifty stars on the United States flag that represent the stars.  I thought Z would appreciate that.

I finally bought myself template plastic.  I traced a five-pointed star out of my hand-quilting motifs book onto the template plastic and then I used that to trace the stars onto the quilt.

I put the stars in two places: I put some in the centers of the large red squares (16) and I put the rest on the inner blue border (34).  On the inner blue border, I wanted it to be symmetrical, so I had 9 stars each on the top and the bottom (18) and eight stars on each side (16).  Here’s a picture of stars on the blue border:
IMG_1175

IMG_1183

See the inner border – it’s made of two shades of solid blue fabric, a royal blue and a lighter blue.  My phone doesn’t take completely true to color photos, so the two shades show up properly in the top picture above with the two stars, but not the picture below it with the row of stars.

I traced all the stars so that they faced the top of the quilt.  I quilted the stars on the blue border with white thread.

On the bottom of the quilt, I accidentally traced the stars upside down and then had to fix it:

IMG_1162

I need to figure out how to get the silver marking pencil off of the quilt before I gift it.  Normally I don’t mind if the lines are still a little visible, but this is pretty bad.

Here are the stars as they show up on the back:

IMG_1176

Tomorrow: more stars!

Quilt for Z – Part II

As I mentioned in my last post, I’m making a quilt for my boyfriend Z for our anniversary.  I’ve begun quilting the borders of the quilt, and this post will cover the two outer borders.  I still have to do the inner borders and quilt the center of the quilt (the Storms at Sea patches); hopefully this coming weekend I’ll make some progress on that.

I started with the middle border, comprised of the red print at the corners with the blue and white nautical squares in the center on each side.  I considered all of my thread options:

IMG_1125

For this border, my ultimate debate was whether to go with blue or red and I chose red.  The other thread options may appear later in the quilt.

The pattern I picked looked like two waves reflecting each other, although when I quilted it, the ultimate result reminded me more of a (slightly sloppy) double helix.  I used a design from  “501 Quilting Motifs: Designs for Hand or Machine Quilting,” by Quiltmaker Magazine.  I got it for my birthday and I’ve been using it a lot.  

First I traced the pattern in silver pencil.  I traced it to overlap at the corners, as the quilting design book suggested.  Then I machine quilted.

IMG_1128IMG_1132

The finished design is, as I said, more uneven than I’d like.  I think I didn’t trace very well, to be honest.  The red shows up nicely against the blue and white squares, but it blends into the red print.  Maybe I should have used blue, although that would have blended into the blue squares.

I started from each corner and sewed to the left first.  When I got to the end of a side, I finished the stitching by back-stitching and then went back to the corner and sewed to the right.  Then I did the next side of the quilt, and the next, and finally the last side of the quilt.

IMG_1130 IMG_1129

The biggest issue I had, which isn’t visible in these pictures, was that the sides of my quilt were’t completely even.  I worked from the corners inward, and on a couple of the sides of the quilt the pattern didn’t meet properly in the middle, so it ends up looking extra messy.

For the outer border I picked a far more complicated pattern, but I like how it turned out much better.  Certainly I think I traced more carefully; I probably also sewed more carefully because it was so complex.  Here are several pictures of the pattern after I had traced it onto the outer border and pinned accordingly.  (I cut out the pink thread that I’d used to baste the quilt together before I machine quilted, for both borders, because sometimes when you machine quilt over the basting thread it’s difficult to extricate the basting thread, and I didn’t want to have that problem.)  The design is also from the 501 motifs book.

IMG_1133 IMG_1134 IMG_1135

I used a pale blue thread for the quilting.  In this case, I purposely traced the pattern so that it went around the corner but it didn’t meet in the middle of each side.  On each edge of the quilt there’s approximately a six-inch gap in the quilting right at the center.  As before, I started with one end of the traced pattern and sewed to the left first.  This pattern required two continues lines sewn to the left and two continuous lines sewn to the right.  I’m not sure if that makes sense, but if you tried it you would see what I mean.  There are four lines of stitching that intertwine, but they meet at the beginning and the end of each traced pattern.  I don’t have a picture of that right now; I only took a picture of a corner.

IMG_1136

As you can see, it looks much nicer than the middle border.  I doubt Z will mind, though.  I’m really pleased with how this quilting pattern came out, so I’ll probably use it again.

Next time: more quilting!