Appliqued Doll Quilt

My doll quilt involved some applique practice and getting rid of scraps.  My guild makes stockings and stuffed animals around the holidays, and a couple of years ago I wanted to make stuffed animals but I didn’t realize that I needed to blow up the pattern to a larger size.  The pieces came out so small and I gave up on the stuffed animals.  (I think I made one tiny dinosaur.)  I had pieces cut out, including pieces to make a stuffed dog.   I also had a blue circle shape – leftover from this present I made for Anlichan.

I took the two ear pieces and sewed them right sides together, then turned them right side out. I turned the open end under and stitched it down to the dog body piece.

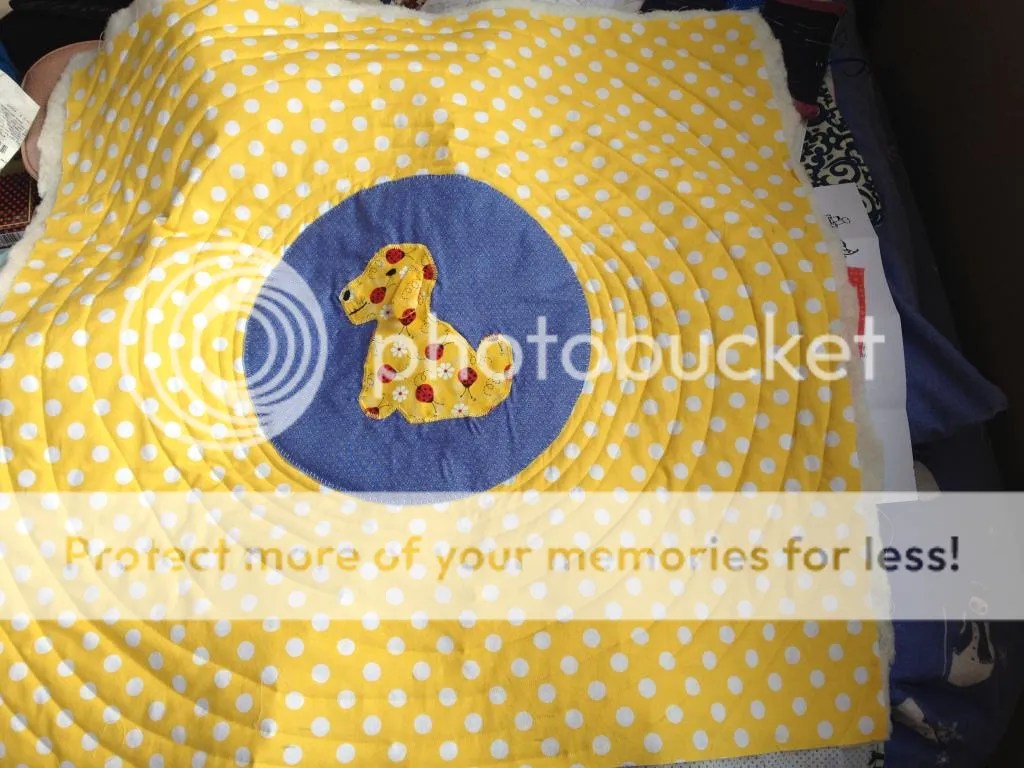
I had already embroidered the dog’s eye and nose when I was going to make the stuffed animal originally, so I didn’t need to worry about that.  I machine appliqued the dog to the blue circle with yellow thread using a zigzag stitch. (I’ve since learned that it works better if you use your satin stitch foot!)

I fused that to a large square of the polka dot fabric leftover from my polka dot Drunkard’s Path comforter.  I used a blanket stitch to hand applique it down.

I used batting scraps and a square of the shirting fabric that I’m still trying to get rid of to make the quilt sandwich.  I quilted a spiral from the circle outward to the edges.

Here’s how the quilting looks from the back:

Then I squared it up and I added the binding.  I used the leftover binding from the American flag quilt I made.  I hadn’t measured it to make sure it was long enough, but I got lucky and it was slightly longer than I needed.  (I didn’t want to make binding, and the red, white, and blue looked cute with the blue and yellow fabrics in the quilt.)

I realized as I was sewing the binding down that the shirting fabric had a little stamp on it, and that the marks showed.  So I made a little quilt tag to cover it.  It says “For someone special.”  Maybe I should make little tags for all of my charity quilts in the future.

Easy Valentine’s Day Decorations

I made quick and easy decorations for Valentine’s Day.  My roommate and I had a small dinner party, just my boyfriend and another friend, and I spent my day at my guild meeting and then cooking, so I didn’t have a lot of time to decorate.

I’d had an idea – probably during my guild meeting – for decorations.  I cut out hearts from pink fabric.  I just did it freehand and then trimmed as necessary.  My plan was to safety pin them to ribbon and tie the ribbon around our kitchen cabinet handles, but the ribbon pulled too much when I did that and the hearts wouldn’t hang straight.   I ended up pinning each end of ribbon to the heart instead.

Cute, right?  I made six of them and it took maybe ten minutes.  I’m going to reuse them for applique, maybe for a doll quilt or something.


February Bee Block

Bonus post this week!  I finally finished my February bee block and put it in the mail, and I wanted to share it with you guys.  Cyndi from cyndistitches.blogspot.com was our queen bee for the Stash Bee this month.  She requested a block she called “Woven Strings” blocks, with bright strings pieced into a 9″ white square.  I didn’t have any solid white fabric, so I bought some Kona Snow.  (I later realized that Cyndi had offered to send people white fabric if they didn’t have any – but that’s okay!  This way I saved her some postage.)  I have plenty of bright fabrics!  That was easy.  Most of what I pulled were scraps, plus a little of a Kona solid in some shade of teal (I’m not sure which one) and a purple print from my Aunt D’s stash.

I laid the strings out before I stitched them.  I was afraid if I did it by improv piecing I wouldn’t have an even distribution of colors and warm/cool tones.  I flipped the two yellows between when I laid them out and when I actually pieced them, but that doesn’t matter as far as balance is concerned.

Cyndi’s instructions were really easy to follow.  She instructed us to cut a curve in the block, then piece in a string, then rotate and cut another curve or a straight line, insert a string, and continue until you’ve pieced 6 or 8 strings into your block.

I was nervous about piecing such narrow strips on curves, and I thought it would take me forever, but it went pretty quickly.  I had a much easier time pressing my seams toward the dark than pressing them open on January’s block!  Making sure my strings lined up after I sliced them and inserted another string was a little difficult.  I wasn’t thinking about it the first time it happened but I tried really hard to match them up for the rest of the block.  I think it came out well anyway.

Here’s my finished block and I think it’s really cute.  I hope Cyndi likes it!  I don’t think I would make it again, but it made me think of fun ways to use my strings.  I have some ideas now for doll quilts – I just need the time to put them into practice!

Cyndi asked us where we could live if we could move right now.  Given that right now it’s about 10 degrees outside (and it feels like it’s below zero), my first instinct is somewhere warm!  Actually, I like the area where I live, but I’d rather live out in the suburbs where I could have more space.  (I have no room for all my quilting stuff!)


Handstitched Projects – Part III

I wanted to show you the embroidery for our Handstitched class.  As I mentioned, I made HSTs and thus skipped some of the embroidery to save time.  That left satin stitching for the “jewel” shapes (I would call them clubs, like on a deck of cards).  I bought a few different colors of embroidery floss, and I ended up using fushia and teal.

I used the fushia on the corners and followed Rachel’s instructions.  I backstitched the jewel shape, did a running stitch from each corner to the jewel shape, and then did the satin stitch in the spaces between the running stitches to the edges.

When it came time for the four center “jewels” I switched to teal.  I was running out of time at this point – I’m working on several other projects right now – so rather than doing satin stitch all the way around the jewel shape like on the fushia ones, I just backstitched the jewel shape.  Then I did running stitch from corner to corner, crisscrossing the jewel shape.

Here’s a picture of the whole thing:

Our next assignment is English paper piecing and I’m despairing about when I’ll have time to do it!  I have sooooo much other stuff I’m working on that I’d like to show you and there hasn’t been time!

Christmas Presents: Apron

I cut the fabric for this apron over the summer when I went on a major cutting spree and cut fabrics for a bunch of projects. My plan was to make it for my dad’s birthday, but that never happened. So I pushed it back to Christmas.

I have a lot of dog-themed fabric. Some I bought in bundles a long time ago and some I must have bought separately. I used different prints for the top and bottom of the apron and the straps and pocket.

I was going to make it one sided and fold the edges under, like I’ve done with the last couple of aprons I’ve made, but I don’t like having the rough edges you get from the seams. So I decided to make it two-sided. I pulled out this cute border collie fabric. My parents have border collie mixes so the fabric is perfect. I used this plaid for a pocket and sewed it all together.

Blurry picture of one side:

Picture of the other side:

I didn’t quilt it.  I also didn’t take any pictures of me modeling it.  The neck strap is too long, even more so than usual.  I made it long with the understanding that my dad or my brother might end up wearing it at some point, but the rest of us would need to knot the neck strap.  I think the apron is super cute, and Mom and Dad really liked it.

Shoe Bags and a Project Bag

Hi habibis!  Happy Wednesday!

Today I’ve got more bags to show you.  First, I made some shoe bags.  I saw this post on Kellita Makes and I thought shoe bags would be a great idea for traveling.    I went back to the post a couple of weeks ago and clicked through – in October Kellita posted links to several tutorials and I chose this one.  I didn’t follow her instructions 100%.  When you fold the top down to sew the space for the ribbon, she sewed two seams, one at the very top to form a tube.  I skipped the top seam and simply sewed the one bottom seam.

One of these bags was a present for Spry.  I used this cute red check print – gifted to me by our mutual friend Nikki – and rather than ribbons I used (no joke) the straps from my bridesmaid’s dress for my brother’s wedding.  We never used the straps, and when I went to throw them away I thought perhaps I could use them instead.  I ripped the little garment hooks off the straps and threaded them through.  I love the pop of blue against the bright red.

I made two shoe bags for myself, using leftover green fabric from my brother’s wedding quilt.  I made a third bag that’s extra big, for boots or for laundry.

I made a slightly more complicated bag for my projects.  I’m slowly progressing through an embroidery sampler T-Rex gave me, and I wanted a bag large enough that I could just slip it in, with a pocket to carry around my embroidery thread and other little notions that go with it.  I decided to use the leftover green fabric, as well, but I wanted to use a lining just in case, on the off chance that the dark green might bleed onto my projects.  (Paranoid?  Probably.)   The bag is lined in a cream print with little crescents and the pocket is lined in scraps of yellow I’d used to back my grandma’s yellow and orange quilt.

I used batting scraps to make it sturdier.  I quilted the layers to hold them together.

I made this little pocket for notions and I used ribbon and the buttons from my Aunt D for closures.


Wine Bags

Hello habibis!  Today I’m going to show you some wine bags I made for Christmas, and a modified one I made for a bottle of maple syrup for Z’s grandpa.  Come back tomorrow and I’ll show you some bags I made for shoes and the project bag I just made myself.

I made the wine bags basically the same way I’ve made them in the past.  See here.  I love this wine glass fabric.  I think this is the second time I’ve bought it.  I couldn’t find my wine bottle fabric – that popped up in my stash later, so I’m saving it for next time I need to make wine bags.

For Z’s grandpa I shortened the bag to better fit the maple syrup bottle.  I used more of the green fabric from Aunt D’s stash – it’s such a nice rich green, don’t you think?

I used cream ribbon for the ties for all the bags.

Cute, right?

Handstitched Projects – Part II

Hello habibis!  Today I want to show you the center medallion for my Handstitched quilt.  I’ve added the first three borders, in anticipation of this week’s embroidery lesson.

Rachel’s instructions for the first border included mitered corners.  I found them a little difficult.  First you sew the borders on, leaving the ends loose, and then you sew each set of corners.  I can’t explain it as well as Rachel did, so I won’t try – if you’re interested in mitered borders, I’d advise you to message her.  Mine don’t look nearly as neat as hers.  I couldn’t make them lay flat, but I tried.  I don’t think I’d use this method again – my corners would have come out more nicely if I’d done my borders the normal way!

Here are some pictures of my progress:

This might be my best corner:

The next border is for embroidery.  Rachel instructed us to use white strips, but she said that quilters comfortable with HSTs could substitute HSTs and solid squares for the strips.  I didn’t use white – I used solid(-ish) colors instead.  The embroidery will go on the pink pieces, which are at the centers and on the corners.

The third border was mitered corners again.  I’m afraid despite my efforts my center didn’t come out quite square.  I hope that won’t affect the rest of my quilt too much!

This week I’ll embark on the embroidery stage!

Assorted Christmas Presents: Bookmarks, Golf Towels, and a Mug Rug

While I was improv piecing the coasters for my cousin M, I took extra scraps and made this bookmark for my sister’s boyfriend. It’s a weird shape – too wide and not quite long enough, I think. I quilted it with vertical lines in navy thread.

I made another bookmark for my friend A. She’s from Tennessee so I picked orange (for UT). (And she loves orange.) I have a great set of library-themed prints I got from Connecting Threads once so I used the orange book print. (A is also in academia and was an English major when we were in college, so I knew she’d appreciate the books.)  I quilted it with vertical lines.

For A’s birthday I made a mug rug. I’d never heard of mug rugs until I started paying more attention to the quilt blog scene. A’s is made with the orange print and this brown print with spirals of books. The other side is these library book stamps in cream. I quilted it with a freehand spiral.  Freehand spirals are kind of fun.

I got the idea for the golf towels from one of the sewmamasew handmade holidays gift guides (http://www.sewmamasew.com/2013/11/november-19-gifts-for-men/).  They had this tutorial for golf towels: http://www.aspoonfulofsugardesigns.com/2012/08/golf-towel-tutorial.html.  I kind of followed it.  I made the golf towels for my uncle P, who’s a really big golfer, and my cousin who enjoys a round of golf.  (Presents for men can be difficult!  Especially homemade presents.  The golf towels weren’t too hard to make and I didn’t have to worry that they would look cutesy.)

I bought two fluffy white towels and set to work.  I pulled out my golf ball print. I’ve used it before.  I cut strips wide enough that I could fold the edges under and cover this non-fluffy stripe at the end of each towel. I wanted the fabric to go all the way around, which involved sewing over it on one side. I used white thread to blend. I folded the edges under at the end but the backs just aren’t perfect.

The other challenge was the grommet thing for the carabiner. I went to Michael’s and bought eyelets and an eyelet tool. I didn’t notice that I bought 8 mm eyelets as the tutorial instructed but an 11 mm eyelet tool. If you’ve never done this before, the eyelet tool is supposed to fit right inside the eyelet and then you hammer it down and the force seals the two eyelet pieces together.  With a larger eyelet tool it doesn’t fit right inside so you can’t evenly apply the force. For one towel I managed it anyway. Then for the other towel I tried multiple times and my dad helped, too. We had to give up because I ran out of eyelets.  In this picture both eyelets look like they’re on, but one was loose and came off.

So I used a zigzag stitch to sew up that hole in order to fit the carabiner in. I had to sew around it twice but it worked.