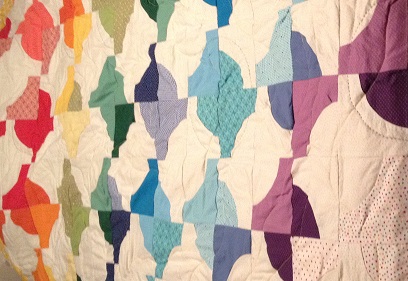
June Bee Block: Flowering Snowball

This month Deana was our Queen Bee and she requested Flowering Snowball blocks in a wide variety of bright colors, with low volume background prints and black for the centers.  She pointed us to this tutorial, which I followed to the letter.  I’d done curved piecing for my Drunkard’s Path quilt, so I wasn’t too nervous, but I found that the hardest part was picking my prints and the block itself came together really quickly.

I’m sorry for the terrible picture – I’m cutting it a little close with this one, so I frantically took a picture of the block on my couch before I left for work yesterday.

Deana’s question for us was “who got you hooked on quilting?”  I don’t have the traditional answer for this – I didn’t learn to quilt from anyone.  One of my friends from college died in a car accident a month to the day after our graduation.  It was a really difficult time for me.  I had trouble sleeping and I would look for projects for myself.  One day I decided that I should make her mother a quilt.  My grandmother had taught me to sew, but no one in the family had ever quilted.  I don’t know where the idea came from, but make a quilt I did.  I had no idea what I was doing, but I enjoyed it.  Then I had friends get married and I made them a quilt, and a friend had a baby and I made her a quilt, and before I knew it I was a quilter.

Anlichan’s Origami Quilt

Hello habibis!  I wanted to share with you the amazing Father’s Day present anlichan made for her dad this year: a flag made completely of origami.  Check it out here.  It’s called an origami quilt, which I believe means it’s made of a bunch of pieces of paper that interlock.  How cool is that?

I will hopefully post about my bee block tomorrow.  I finally finished it – with a week to go, but it feels super last minute – so now I just need to get it in the mail.

Lotus Quilt – Part III

Today I want to share the quilting I did on the Lotus Quilt and the scrappy binding I made.

For the quilting, I started with my walking foot.  I didn’t bother to trace lines – I just followed the lines of the striped squares.  I used white thread.  They didn’t come out perfectly straight, but when does my quilting ever come out perfectly straight?  It looks good from far away and I think most non-quilters wouldn’t notice or care if it’s not straight, anyway.

Here’s a close up from the back:

The diagonal quilting sometimes ended with a blank square, and I didn’t feel like my skills would allow me to continue the diagonal lines straight without guidance, so I turned off and followed the edge of the square like in the top photo along the left side.  It might show up better in the one below.

It made for a cool geometric addition to the quilting, which I like.

Then I quilted in the border with straight line quilting, a little more than a quarter inch apart.  I did three lines around.  On two of the corners I cut across, but on the other two corners I didn’t – because I was saving those two blocks for hand quilting.  The white on white quilting didn’t show up well in my picture of that, but I hope you can discern it.

I wanted to hand quilt C & G’s initials in the one block, and the wedding date in the other.  I debated thread colors: should I use black thread on the white block, and white thread on the black block?  Or should I use a bright color to add a pop?  I have a variegated blue thread that I really like, and when I asked my roommate’s opinion she agreed that I should use that on the white block, and to use white thread on the black block.

In the end, I ran out of time and I quilted a heart in white on the black block, rather than the wedding date.

The binding is made from more of the Alexander Henry print I used on the back, along with a black and white floral and a grey print of fans that I’ve had for a long, long time – that is some of my oldest fabric, I think.  I really like scrappy bindings and pieced backs – which is convenient for me, given that I almost never have enough yardage for a full back.

Here’s the full quilt from the front:

And the back:

Lotus Quilt – Part II

Hello habibis!  Today I’m going to show you the scrappy back I made for the Lotus Quilt.  Tomorrow I’ll show you the quilting and the scrappy binding.

I pulled out all of my black and white prints – and I have a lot.  I bought a bunch awhile ago, because I was planning to make a black and white quilt (or a taxi cab quilt – black, white, and yellow – remember when that was THE palette, a few years ago?  or a black, white, and red quilt – anyway, I never got around to it).  I picked the ones I thought went together the best.

For the back, I started with this print with the pops of red; I’ve always liked it and never wanted to cut it up.  Putting it in a scrappy back is perfect, because I can use the whole piece.

I also used this Alexander Henry print I’ve had for years, “Go For Baroque.”  I don’t know what I thought it said when I bought it, but I was surprised to pull it out and see that it says things like “Here Comes the Sun King.”  It’s a fun print, though.

I finished with a silver-y on black print.  I don’t have a close up of it, but you can see it in the top photo.  The back is asymmetrical – I used the largest pieces of fabric I could, basically.  My roommate thought C would like the back as much as, if not more than, the front, and I have to say I really love it, too.


Lotus Quilt – Part I

Hi habibis!  Today I’m going to start sharing my Lotus Quilt.  Molli Sparkles says to lead with your best photo, so here we go:

I made this quilt for my friend C and her husband G, who just got married.  When I had talked to C about what she wanted, aesthetically, she told me she really liked the Hunter’s Star quilt I made for my coworker M.  That quilt reads black and white if you don’t see it up close in person, and black and white was what she wanted – solids, too, rather than prints.

Solid black and white sounds a little boring to me, and I didn’t want to do another Hunter’s Star quilt.  I bought a white-on-white print and a black-on-black print that both read as solids, and I spent a lot of time thinking about what pattern I wanted.  I finally decided on houndstooth.  I followed the Missouri Star Quilt Company’s YouTube tutorial.

The tutorial calls for using charm packs and then sewing four strips of fabric into long tubes.  You lay the tubes flat and cut triangles out of them, which gives you a striped square.

Then you lay out the squares alternating with your solids to make the houndstooth pattern.

I guess I didn’t use exactly a quarter inch seam allowance.  I also seem to have cut some of my tubes on a weird angle, so I ended up having to trim my squares down to 4.25″.  (I guess with the charm packs you could work with a 4.5″ square and it would all match up, but I hadn’t used charm packs – I’d cut yardage into 5″ squares, not thinking about the fact that charm packs aren’t 5″ because of the pinking.)  Some of my striped squares – the ones cut on weird angles – were really wonky and I couldn’t get 4.25″ out of them, so in the end I had something like 63 usable striped squares instead of the 80+ the tutorial called for.  Rather than making a 12 X 14 layout, I made a 10 X 12 layout.  I also had to cut down the 5″ squares I’d cut from yardage to 4.25″ squares.  (Don’t worry; the scraps went into dog beds – they still got used!)

The tutorial tells you to be really careful with your layout, because if you mess it up you won’t make the houndstooth pattern.  One row is black alternating with the striped squares, oriented in one direction, and the next row is white alternating with striped squares, oriented in the other direction.  I pre-sorted all my striped squares into the proper orientations before I began sewing them so I wouldn’t mess up.

I made one mistake.  Well, actually, I made the same mistake in every single white row.  The black row is black square plus striped square.  Then I sewed my white rows the same, white square plus striped square.  It should have been striped square plus white square.  So, when I sewed all my rows together, without realizing what I’d done, I flipped the white rows to get the proper alternating layout – which inverted the striped squares and meant I no longer had a houndstooth pattern.  I figured this out as I was sewing together the very last seam for the quilt top.

Do you have those moments where you freak out over a mistake?  I was so upset.  No one wants to rip out stitches, especially not ten rows of stitches.  My roommate told me to leave it as is – C and G didn’t know I was making them a houndstooth quilt, so they’d never know if I messed up.  (C, if you’re reading this, sorry!)  After some deliberation, I decided I couldn’t deal with ripping out all my rows, and then ripping off one white square from each row, reattaching it to the other end, and sewing all twelve rows back together.

Then I realized that the pattern reminded me of stylized lotuses and I felt way better.  So much better.  And that is why this is the Lotus Quilt and not the Houndstooth Quilt.  (Or it could be Yoda heads – I’m tickled by the idea of making a Yoda quilt.)

I added a border from leftover white fabric to make the quilt top a little larger.  Here’s the completed top:
Can you see the lotuses?

Blogging thoughts

The fabulous Molli Sparkles – who is one of my favorite bloggers – has put together a list of advice for new bloggers and I just wanted to share it with you.  I’m not sure I do some of these things myself (lead with my best photo? Don’t overshare?  Don’t apologize too much?  Yeah, pretty sure I could use some work on those categories!), so I think they’re a good reminder for all of us.

And now, a picture!  (Molly would approve, right?)  A sneak peak of a finished quilt that I’ll be sharing starting tomorrow:

May Stash Report

Hi habibis!  It’s time for the May stash report and I have a lot of activity to share!

First, I gave my friend C a quilt for her wedding, which I’ll start sharing next week.  Per my calculations, that worked out to 4.75 yards.

I brought more donations to my guild!  My estimate is about 40 yards.  (Doesn’t that seem like so much?!? I had to bring it all in a suitcase.  I tried really hard to give up things I know I won’t use, even if I like them, but I still have sooooo much fabric.)

I gave some Kaffe Fassett charm squares to my friend  – that’s about half a yard.

The drawstring bags for my mom and my grandma came out to about 3/4 yards.

My May bee block plus the extra pieces I sent along came out to 3/4 yard.

I made six dog pillows, but I only measured two of them, so I have to estimate the rest.  That’s about 1.25 yards.

I made seven dog mats.  That used up 3.75 yards.

Lastly, I donated some extra dog-themed fabric, which worked out to about 1.25 yards.

So my total outgoing for the month of May is 53 yards.

My previous total through April was just under 63.5 yards, so my new total for the year is 116.5 yards!!!


April and May Charity Sewing

For April and May I focused my efforts on pillows and crate mats for local animal shelters, to help me use up my scraps.

First, the pillows:

Most of these are made with scraps from my grandfather’s tshirts.  They’re lumpy and weirdly-sized, but hopefully they’ll be snuggly for some shelter animals.  There are a total of six – five of approximately the same size and one that’s very long, made with some scraps leftover from a tablecloth my mother cut up to make book holders for her students, plus more tshirt or sweatshirt scraps.

Basically, I sewed pieces together until I thought I had something pillow-sized, and then I stuffed them, except in the case of the extra long one; I think there I got carried away.  I finished some of them by hand, but I thought better of that and the later pillows are closed by machine.  I’m not sure handstitching the pillows closed will hold for animal use.

Second, the crate mats:

I used more tshirt and sweatshirt scraps, some fabrics from the stash Aunt D gave me, and some old pajama pants.  (I’m a little concerned that the pajama pants might not hold up well enough for shelter use – both pants had to be taken out of my pj rotation because I wore the seat of the pants through, beyond my ability to repair, but I only used the legs for the crate mats.  One of them had a spot that looked a little threadbare, which I didn’t catch until I was looking at my quilting, so I hope they survive long enough to be useful.)

I used the crate mats to practice my machine quilting.

I made two mats from a set of pajama pants with this great print.  I quilted them in a matching aqua thread to follow the pattern.  Since the pattern was laid out differently on the legs of the pants, the quilting on the two mats is slightly different.  I was really pleased with it.

On this one, I’d started to quilt around the edges and through the middle with white thread, and then I realized it would be way cooler to follow the pattern.

Here’s the back, from Aunt D’s stash:

On this mat, the pattern almost matches up:

The other pajama pants were kind of a mint green with yellow polka dots.   They also made two mats.  I quilted them with aqua thread.

The first mat was paired with a beige sweatshirt.  I quilted it in curves.

The second one was paired with this harlequin print.  I did the quilting following the lines of the print in a crisscrossing pattern.

The other three mats are from tshirt and sweatshirt scraps, and I quilted them all in square spirals (is that the word for that?) using blue thread (some aqua, some navy) and some white, as the bobbins ran out.

One:

Two:

Three: