Blogger’s Quilt Festival Entry: ROYGBIV Category

Hi habibis! Amy’s Creative Side is hosting the Blogger’s Quilt Festival for this fall and I’m entering for the first time!   I’m entering my Drunkard’s Path comforter in the ROYGBIV category (and the wedding quilt I made for my friend N in the hand quilted category).  See all the posts here and make sure to vote!

I love this quilt soooo much.  I possess a total of four of my quilts currently – two I made for my grandparents and a windowpane quilt I made for myself – but my Drunkard’s Path is special because it’s the very first quilt I made for myself.  I wanted to replace the comforter I’d had since freshman year of college, which was old and not in great shape, and I finally got around to starting a quilt to replace it in late fall of 2013.  I have a deep and abiding love for polka dots (all prints in general, but especially polka dots) and I decided to make myself an all-polka dot quilt.  Furthermore, I wanted to practice my curved piecing, so I picked Drunkard’s Path as my pattern.

I had a ton of polka dot prints in my stash already, but I bought two prints specifically for my quilt: a white with lavender dots to be the background fabric for the Drunkard’s Path blocks and a yellow with white dots for the border and backing.

IMG_0962


I cut 6″ squares from the white print and from my collection of polka dot prints.  Then I cut them on the curve and matched them up.

IMG_1106 IMG_1121

I’d done a little bit of sewing on a curve, but not much.  I basically just pinned as carefully as I could!  This part took a looooong time.

IMG_1115


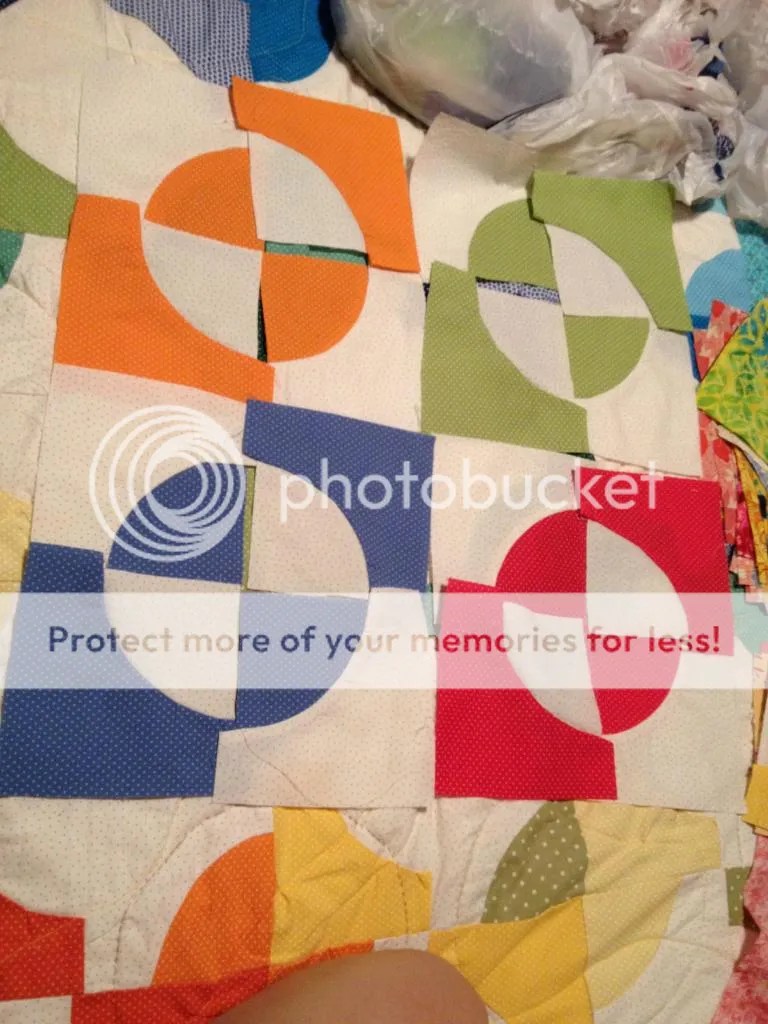
When I had sewn all of the patches, which I did on and off for weeks (maybe even a couple of months) while I worked on other things, I settled down to arrange the layout.  I went in color order, more or less, starting with the black and white polka dot prints at the bottom left and moving toward pink at the top right.  The order is kind of like this: black – white – purple – blue – green – yell0w – orange – red – pink.

I sewed my rows together and added the yellow border.  This is my parents’ couch modeling the quilt for me.  🙂

I did two types of quilting on the main part of the quilt, by machine and by hand.  By machine I did a meandering line in yellow all over the quilt.  (I won’t call it stippling because it’s not close quilting at all.)

For the hand quilting, I traced circles using plates and quilted them with a running stitch, using threads that matched the colors of that section.

I quilted the border by machine, as well.  I quilted half circles in different colors all the way around the border.  I used pink and blue thread on the semi-circles over the border and green thread on semi-circles reflecting the blue ones.  Doesn’t it look cool?

Here’s the finished quilt, in its place of honor on my bed.  You may notice that I use it as the picture at the top of my blog, as well, because I love it so much and I think it’s very me.

Blog tags

I want to make the blog more reader-friendly, and I realized that tags are a good way to do this.  I’ve gone through all of my posts and added tags based on various themes. I’ll tag this post with all of them so you can more easily find anything you’re interested in, and my goal is to be more conscientious about tagging in the future.

In the course of doing all my tags, I realized that I posted twice about the Storm at Sea runner I made my parents, once in 2011 and again last December during my Advent posts.  Perhaps if I’d had a better tagging system I would have remembered that I’d done it before!  It was fun to go back and look at the old posts – I’d forgotten what some of the blocks were called and I had to read the posts to see which quilt I was writing about.  Most of my pre-blog quilts are on here, although I know of at least four that aren’t.  Perhaps those will be fodder for Advent 2014!

The tags fall into several categories: block type, type of item if it’s not a quilt, language if I was quilting in something other than English, etc.   The blocks I have thus far are as follows:

Drunkard’s Path – Storm at Sea – Hunter’s Star – Lone Star – hexagons – pinwheels – Steps to the Altar – Rail Fence -Windowpane – Log Cabin – “Elegance” fan block – Korean patchwork – Amish Square – Bow Tie block

If you happen to notice that I have the wrong name for a block or if there’s another name for it, please let me know!  In one case – the wedding quilt I made for my friend N last year – I’m not sure if there is a name for this kind of quilt.  (https://habibihomemade.wordpress.com/2013/07/16/wedding-quilt-for-n-and-a-part-i/)  If there is a name, please share it with me.

I made a tag for doll quilts, since I make so many of them, and if I used a particular block I tagged that as well.  I may have missed some, so leave a comment if you notice that a block went untagged.

Tags for non-quilts include, in no particular order: pot holders; kitchen/household; holiday; decor; pillows; napkins; clothing; ornaments; aprons.

I’d forgotten how many pillows I’d made, for example.  Kitchen/household covers pot holders, napkins, and aprons; aprons fall under clothing, too.  Decor includes pillows, runners, and wall hangings, but runners and wall hangings don’t have separate tags.  Holiday includes ornaments and stockings, the latter of which also don’t have a separate tag.  If you think it would be helpful for me to make a runners tag or a wall hangings tag or a stockings tag, let me know.  If you see anything I haven’t tagged that you think I should – a quilting design or a specific stitch or whatever – just leave me a comment.

Hopefully this way my blog will be much easier to navigate.  I like to read other quilters’ blogs and I’ve learned not just from what other people are making but from how they’re blogging about it.  Tagging struck me as a relatively easy way to be more accessible.  This is for you, so feel free to give me your input.  If you want a “wedding” tag or a “birthday” tag or some other category that you think would be useful, I want to know about it.

Enjoy!

Drunkard’s Path doll quilt – Part II

My quilt guild collects doll quilts for the following charity: http://www.emergencydolldispatch.org/donate.html. They give dolls to children who’ve been abused and they like to give a quilt with each doll.  It’s a very worthwhile cause.

This week I’ll cover the quilting of the doll quilt.  I quilted it the same way I’d quilted my bedspread, with circles traced using a plate as a pattern.

As you can see, I made four circles, one at the center of each color block.  I used white thread.  I thought that would give me the cleanest look.

Here’s what the quilting looks like on the back:

The bottom right corner seems really puffy, which I guess means I did a poor job of pinning it flat, but that’s not  unusual for me.

Next week we’ll have a change of pace from the doll quilts.  I have a couple of in-progress quilts to post about, one for myself and one for a coworker.

Drunkard’s Path doll quilt – Part I

My quilt guild collects doll quilts for the following charity: http://www.emergencydolldispatch.org/donate.html. They give dolls to children who’ve been abused and they like to give a quilt with each doll.  It’s a very worthwhile cause.

It almost seems inappropriate to make a doll quilt out of a pattern called Drunkard’s Path, doesn’t it?  I chose sixteen leftover patches from my quilt that sort of matched each other: orange, red, green, and blue.  I arranged them in a way that pleased me:

Then I sewed the strips into the quilt top:

I LOVE this and I would have liked to simply leave it as is, but it was only 20″ square.  I picked out a red print with white cherries, but I was afraid it looked busy and J (my roommate) concurred that it was way too busy for the lovely simple pattern.  After some consideration, I decided to use the white polka dot print in the patches as a border; J agreed that it would be much cleaner.

I pieced a back using two red prints (which, if I remember correctly, are from a 30s reproduction collection I bought at some point, but I could be wrong about that).

Here’s the assembled quilt top, pinned and ready for quilting.

Next week I’ll cover the quilting.

Quilt for Me! – Part VIII

Time for hand quilting!  I had considered doing champagne bubbles all over the quilt, but I ended up just doing ten or 12 large circles. I took a dinner plate and traced it to make each circle.  I centered the plate over clusters of matching fabrics (all pinks or all yellows) and chose matching or coordinating threads.

Here’s the finished quilt:

I love the quilt.  It’s lighter than my old comforter, so it’ll be perfect for summer but it’s not really warm enough for winter (especially not this winter!) – so my plan is to make myself a second quilt.  By the time that’s done, winter will probably be over, but I can save it for next winter.  In the meantime, I’ve just been using extra blankets.

Quilt for Me! – Part VII

The final machine quilting I did was on the border.  I had thought about it for some time and what I envisioned was reflecting half circles, on the border and on the blocks adjacent to the border.

I had to do some math to figure out how to trace my semi-circle – drawing is not my strong point.  I used scrap paper and worked on it until I had the shape I wanted.  I finally figured out that I wanted a semi-circle of 4.75″ wide and 2″ high.  I didn’t know how to get a smooth curve, but I was using lined paper, and finally I marked out incremental dots on the paper along each line and I got a nice circle.  I don’t know if that makes sense, but it worked well.  I traced my circle onto my template plastic.

I started with green thread on the blocks along the edge.  I traced the template onto each block.   I’m not sure how well it shows up in the picture.

I traced the circles so they overlapped at the corner.

I only pinned where I needed to, to keep the fabric as flat as possible, because it’s still bunchy and puffy.

After I sewed those semi-circles with the green thread, I traced the first set of semi-circles on the border and sewed them with blue thread.  I traced a second set of semi-circles on the border.

I sewed the second set of semi-circles on the border with pink thread.  I chose pink and blue for the border to contrast best with the yellow.

I had originally planned to add a second set of semi-circles on the inner blocks with purple thread, and I decided against it.  I liked the way the green thread looked so much that I almost didn’t do the circles on the border, but I wanted to practice my curved sewing.

Here’s the way it looks on the back:

I love the effect of the two semi-circles meeting to form a circle.  I don’t know if I would have liked it even better with the purple reflecting the pink, but I was satisfied with it.  I was ready to finish the quilting by this point anyway.

Next time: the hand quilting!

Quilt for Me! – Part VI

As I mentioned last week, I finished the quilt top at my parents’ house (not my usual habit).  Then, I put the quilt together there (like I prefer to do).

I had bought three large pieces of fabric for the backing, all in the same print (white polka dots on yellow).  By the time I took it out, it was quite wrinkled, but my mother taught me a trick: fold the fabric in half and iron it that way, then touch up the crease as needed.  It was so much easier than trying to maneuver a huge piece of fabric on the ironing board.

I laid down the backing, the batting, and the quilt top on the ping pong table.

I loosely basted the layers together and pinned the edges.

Here’s a nice shot of the quilt:

I finished the edges on the machine with yellow thread and then commenced the quilting.  I decided to try stippling, which I’ve never done before.  I used the yellow thread again.

I don’t know how people do all-over stippling that’s really close together.  I made a point to hit every block at least once, but I couldn’t do it close together and I still had trouble sometimes maintaining a smooth curve.  I think I need to practice more on small things, like doll quilts.  I was pleased with the effect but I would like to do it better.  (In the above picture, I hadn’t cut out the basting thread yet – I hope that’s not too distracting.)  Here’s a picture of the finished stippling, but I think it’s harder to see:

Next time I’ll post about the rest of the machine quilting.

Quilt for Me! – Part V

Happy New Year!  I hope everyone had a wonderful New Year’s (and Christmas, if you celebrate it).  Mine was lovely.  I found myself missing my daily posts, even though the schedule became difficult to maintain towards the end of Advent, when I could barely stay on top of everything I had to do before Christmas even without the blog.  It’s nice to relax a bit now that the holidays are over.

When we left off, I had designed the layout for my quilt, but I hadn’t put it together.  Assembling the whole top was one of the tasks I’d hoped to finish before Christmas, but it fell by the wayside.  I started and I got about three rows sewn together before I had to stop.  I stacked the blocks by row and pinned each row together with a number designating which row it was, so I wouldn’t have to recreate my design when I got home.  I knew I’d never get it the same way again.

When I had a free couple of days at my parents’ house after Christmas, I made good use of my mother’s superior sewing set up (which I’ve praised and envied in posts before).  I laid out each row and sewed the blocks, one row at a time.  I then re-pinned the little numbers so I could assemble them all into the quilt top in the end.  I didn’t want to deal with any confusion.

I had a little trouble with the blocks not matching up properly – I had to line them up carefully when I sewed them together.  I guess if I’d traced my Drunkard’s Path templates properly for both halves of each block, they would have matched up better when I pinned them.  Lesson learned!

See how there are bits hanging off the edges?

Here are all the blocks assembled:

I had Googled twin comforter sizes before I started, so I knew I was aiming for a 66″ by 88″ quilt top.  It came out smaller, more like 60″ by 80″.  I believe that’s because the blocks didn’t match up, as I mentioned in the previous paragraph, so each block was slightly smaller than I’d expected.  I’d assumed that the 6″ fabric pieces I’d started with would produce 5.5″ blocks, but due to the curved piecing the blocks were closer to 5″ square.  By the time I was finishing the quilt top, I had anticipated that issue and I was already planning to add a border, using my backing fabric.  I knew I had more than enough fabric to do that.

I cut 4.5″ strips and added my border.

Next week, I’ll talk about assembling the quilt and some of the quilting.

Quilt for me! – Part IV

Today we return to the polka dot comforter I’m making for myself.  I had neglected it for some time in order to finish Christmas presents and Z’s quilt, but I’d hoped to get the whole top done before Christmas.  Sadly, I didn’t manage it.  However, I made considerable progress in top assembly, some of which I’ll show today.

When you saw the quilt last, it was October and I was still plodding away at assembling each block.  The curved piecing took longer to pin and has to be sewn at slower speed.  Plus, I was making 192 blocks.  I finally managed to make all the blocks – in fact, I made too many and I had to take some out.

Here are the finished blocks, organized by color:

The next step was to lay them out the way I wanted.  I had a lot of design possibilities, some of which I had drawn out for myself.  That’s the nice thing about the Drunkard’s Path pattern – there are a lot of different visual effects you can create.

I eventually settled on this one, where the blocks alternate directions.

I also wanted to slowly progress through the color spectrum, and so it took awhile for me to arrange all the blocks the way I wanted.  I know I made one mistake in the layout, but I figured it out way too late to deal with it, so it’ll be in there.  (By the time I figured it out, I was ready to start sewing and I didn’t want to spend more time rearranging everything.)

I started with the black polka dot print, then the colors on white, then purple, blue, green, through the spectrum to pink and red at the opposite corner.

As you can see, they’re alternating in direction and in light/dark (except in the far right corner of the bottom row and the far right corner of the top row, which are the two that I messed up).

It looks pretty cool, right?  I tried to also mix up the colors a bit as I progressed through the spectrum, and I tried not to put too many blocks of the same shade next to each other.

Next week I’ll show the assembly.  Enjoy your New Year’s Eve, however you choose to celebrate it, and may the coming year be full of joy, color, and fabric! 🙂

Quilt for me! – Part III

I’ve started pinning and sewing the curved parts of my blocks.  It takes so much longer to pin and sew the curved pieces than a straight edge would take.  If I did my math properly, I need to make 192 blocks.  So far I’ve got forty-something blocks pinned and sewn, so it’s slow progress.

As I noted in my last post, I hadn’t used both templates for the Drunkard’s Path pattern, only the one template.  I noticed that the templates don’t fit each other exactly and I wondered how it would work out when I hadn’t used both templates.  When I pin my pieces together, I end up with a little bit extra on both sides:

IMG_1115

So I guess my blocks will end up smaller than I’d expected, but that’s not the end of the world.

As you may observe, I pinned these a LOT.  I realized after several tries that 9 is approximately the right number of pins.

Here’s my completed pile so far:

IMG_1118

Here’s what I have left (not counting the blocks with the white centers and the assorted colors on the outside – I’m working my way through the blocks with the colored centers first):

IMG_1121

At this rate, it’s going to take me a long time to get through all 192 blocks.