spry: summer snips

I’ve piled on shorts and a shirt to my chopping block of modding things.

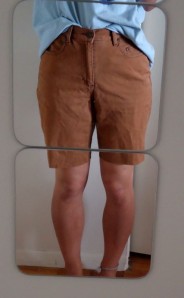
So I took these Liz Clairborne khaki trousers off my mother’s hands because they fit at the waist. They were vaguely skinny, and high-waisted. Totally in right? Right, but they are not quite skinny enough.

Instead of doing the weird, semi-successful pants narrowing thing I’d been doing a lot of lately, I took inspiration from pinterest for DIY cut-off shorts! The key is apparently to cut at an angle.

cutting on the conservative side

I rolled them up once, used hemming tape, then rolled them in again. We’ll see how they hold up in the wash. I may or may not want to add an accent button on the side of each cuff to 1) hide the slightly wonky crimp at the side-seam, and 2) keep the fold tucked.

High-waist pants tend to bunch funny at the crotch, but maybe it’s not too bad?

It’s best to stay on a roll with these projects, so I kept on. I’d gotten this big button-down at a clothing swap because I liked the pattern and knew what I wanted to do with it.

I cut off the sleeves to start, of course, then (using another shirt as a template of course) tightened up the sides. Then, using another sleeveless collared dress as a template, I cut off the shoulders. Then did it another one up and cut off the back bits where my shoulder-blades are.

I always forget to take a “before” picture, but you know what a short sleeved shirt looks like.

Then I actually finished the edges. OMG I never do that! So, it’s quite nice. It would be better if I had elastic for the back to make sure it stayed up, but the bodice is actually rather snug, so I think it’s probably ok. I should/shall add tucks to the front so the arm gap is a little snugger (ie you can’t see too much of my chest from the side).


I am ready for a nice cook out party, right before summer ends (although technically it ended on Labor Day).
spry: pintucking the “designer” way

Adding pintucks seemed like a cute way to make a slightly large shirt smaller around, compared to augmenting the tucks in the back or just sewing up the sides, so I challenged myself to sew straight lines.

Luckily the shirt in question is striped.

I few weeks ago I shortened a skirt with polkadots and thought I wouldn’t need to actually mark the line I wanted to cut along, because I could connect the dots. It didn’t work that way… so, yay straight lines!

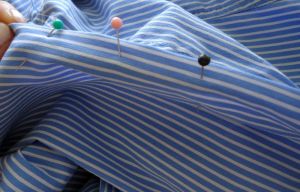
I’d read a how-to pintuck a year or so ago somewhere and didn’t bother to brush up before I started the project. It’s pretty straight forward. Just decide where you want the tuck, fold the shirt along that line, pin it (even with straight lines, one gets cross-eyed), and then sew. (I bet you’re really supposed to iron the crease straight, except I would be liable to iron a giant wrinkle, so I did not bother.) I placed the needle as close to the edge as possible. It took a few lines to internalize how slowly I had to sew to actually sew a straight line. But that’s just me.

Also, it’s much easier to sew on along the edge of a colored stripe than a white one [with white thread] because I kept losing track of where I was sewing, until I waved into a colored stripe, of course.

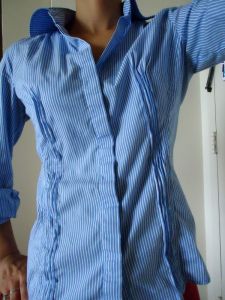
I placed the tucks starting at where the chest-tuck ends to the bottom of the shirt. I put the shirt on after every line to see how the shirt was shrinking. It is not a drastic change.

I had a system of counting lines after the tuck to place the next line. I did three lines on the right-side of the shirt, then decided that I should see how narrow the shirt would be with three lines on the left before adding more.

So I sewed three lines down the left, with my trusty line-counting system.

Of course I did something wrong. The lines on the left came out much closer together than the ones on the right. OF COURSE.

(I think I hadn’t accounted that, for the right side [as in the photo] I was sewing new tucks with the old ones visible. To start at the top of the line on the left side, I was sewing with the old tucks on the underside, and should have counted more lines between tucks, the way I was folding them down. If that makes sense.)

Faced with the dilemma of “equal number of tucks but unequal width of pintucked shirt space” v “unequal number of tucks but equal width of pintucked shirt space,” after brief deliberation I chose the latter. The shirt looked really lopsided with the well-spaced tucks on one side and the bunched-together tucks on the other. And there was no way I was going to rip out all of those lines to redo them.

The size, at least, is now just right.

Since the shirt is so stripy, the tucks actually are more subtle than they would be on a non-striped shirt. Soooo can’t really tell that there are 5 lines down one side and just 3 down the other.

Right?

Well, if you can tell, I’ll just say it’s “designer.”

spry: pies for the pinning

One of our wedding themes is pie. Flowers, pie, and flying pigs. Pink and Yellow, and some Japanesque elements thrown in there for good measure. I’m making a variety of brooches as favors.

I find THESE pins particularly inspired for the theme, and although maybe not all of the embellishments are equally successful, I am pleased as punch with myself:

I hand sewed these. I think you can figure it out visually, but:

  1. Decide how big/small you’d like your mini pies. These are about 2″ in diameter, I used a tea-light holder as a circle stencil.
  2. Decide on how “done” you want the pies to be (ie, what shade of beige), and cut out the circle. I used pinking shears b/c initialy I wasn’t sure how much of the edge I would make visible after the top, and wanted a crimped look.
  3. Pile on whatever filling-colored scraps you like into the middle of the circle. I stuck with berry (pink felt/yarn) and lemon (yellow felt) pies because those were our wedding colors, altho I couldn’t resist a blueberry b/c it’s my favorite. I bet something more shiny would also be nice. For a few, I also needle-felted in some of the extra felting wool I brought back from the last HandiHour for a fluffy, “creamy” pie. I think these came out best (which is why they’re 2/3 of the photos posted).
  4. Cut thin strips of the dough-colored felt. Cut them a little longer than the pie-diameter. Lattice, sew down the edges, and trim. I think three strips in both directions looks nicest, although I experimented with 3×2 also.
  5. Cut another longer piece of thin dough-strip. Sew down one edge. Then start twisting the strip, and sew down every other twist or so, so it keeps its shape. You could also cut a ring with pinking shears and place it on top of the lattice edges, and sew it down in a slightly wavy manner. (The less perfect the strips are, actually, the more “homemade” the pie looks. Unless you’re a super baker and have immaculate strip-cutting skillz. At least these are how my lattices end up looking.)
  6. Embellish if you like (I thought some beads would look like shiny berries, the ribbon made it look both flower-like and punny on prize-winning pies, and well, the yellow ones especially look like sunflowers so the leaves seemed natch), and sew on a pin to the back (daintystitch/glue on a pretty circle of fabric to cover up your stitches on the entire backside first), or just plate it up and have a feltea party!

This project fits in well with the plushie/felt food trend abounding these days also.

spry: paper garlands

Garlands/bunting seems to be trend possibly on the wane, but still prevalant and well, ubiquitous in the etsy-type stylish crafting crowd. I was super on the fence. I caved.

I purchased a 2″ heart punch and a 2″ scalloped round punch, as I wrote a few weeks ago. I separated my pink and yellow construction paper from the multipack, and found the LOVE-printed giftwrap scraps from my 1000 paper cranes. I went down into the laundry room and luckily found a used/free/homeless copy of Howard’s End (which I had read on my e-reader. My choices were that or Pride and Prejudice. I know that P&P is the quintessential marriage plot, and I really enjoyed it, but… I’m more of a Forster person). I got my spray adhesive. And tore the book apart.

Big paper on one side, spray glue, Howard’s End. Repeat with the next sheet, looking every now and then to see if there is a side of the page that’s more appropriate than the other (any mentios of the wedding/love/food, including “fish pie”), until the book is gone. Allow glue to dry.

Turn on TV. Get out the punches. Figure out how to squeeze in the most punches out of one sheet in a combo of hearts and rounds, scanning over the page to highlight mentions of “fish pie” when possible. Repeat until all the pages are gone.

Turn on TV/music really loud. Get out the sewing machine. If you’re up for it, use contrasting top- and bottom-thread colors. Feed the punches through, with a tiny bit of space in between, preferably either really random intervals, or more or less the same. Repeat until all the punches are gone, or you have to change bobbins.

Wrap the garlands on a canister/bottle/something. Carefully. (I fear though that this isn’t going to work as well as I hope to keep the strings untangled. We’ll see.)

I kept the rounds and hearts separate, as well as the solids and prints. Since I’m not a good eye-baller of measurements, I wasn’t sure how much yardage I would get out of the punches (although I’m sure I could figure it out with some sort of math, approximating the length of the paper, etc etc), so I was trepadatious to layer the punches together, although this gives the bunting a fuller look. But this is festive enough.

spry: white collared shirt reborn

I’ve been wanting to do this upcycle for a long while. Simple, yet effective upcycling of a white collared shirt. I’ve seen these spiffy shirts all over the place, with a contrasting inner collar… and thought it would be a great way to salvage (w/out bleach) my grimy-collared summer shirts. Also to spruce up the white shirt in general (I don’t like wearing white collared shirts b/c apparently I look like a waitress in them).

The concept is simple: the grimy shirt w/ the collar stains, wide-ish ribbons, and fusable interfacing/iron-on hemming tape.

iron-on magic

I used two layers of ribbon, pink and gray because 1) the first ribbon wasn’t wide enough 2) the stain was higher than I thought it would be 3) the widest ribbon I has was gray, and that’s boring. I ironed on the pink ribbon first, then layered the gray on top. Which was doubly-good as the tape was slightly wider than the pink ribbon and therefore smeared a little on the top of it (which was covered nicely by the top gray ribbon). I cut the ribbons slightly longer than the collar, fused them, then cut out the proper shape afterwards.

The ribbons are actually the handles of fancy store bags (they are just the right length, altho not necessarily width, as I mentioned), which was a stroke of brilliance, as I’d been fretting on where to buy ribbon in the city, so it’s a double-upcycle. Win!

subtle, yet chic

It really livens up the shirt, even more than I was expecting, and I like that. If I had more ribbon (ie a real spool) I would probably add ribbon to the placket, but I do like the understated “pop” that just the inner collar offers.

Will def be transforming my other white shirt in a similar manner as well, maybe with my school colors, blue and gray.

Spry: a recipe! Cornbread Cake

Soo, although I should probably rather keep this blog more strictly fiber-crafty, here is a “recipe” my mother and I are obsessed with these days (since Thxgiving, actually).

  • one box Jiffy cornbread mix
  • three eggs
  • one can of creamed corn

Mix together, and bake at 350F for ….thirty mins to an hour, in a 8×8 or 9×9 pan.

And it’s delicious. Wonderfully sweet and moist. Perfect for breakfast.

Give it a try!!

Spry: habibi out there!

A few weeks ago I participated in an office craft fair. Luckily it was not too busy at my office, so I could stay mostly at the fair. It was full of serious craft vendors (ie. jewelers), my library-counterpart at this firm, and some people with TASTY food.

Look at my set-up!

It’s two yards of fabric I clearly have not yet turned into a skirt, and various serving dishes. I’m especially pleased with how the Elan pick rainbow!!! Total spur of inspiration on that one. Utterly perfect for displaying pins.

The best sellers were Gottfried and my prototype origami earrings. My boss was my best customer.

I wore the hacked red sweater from last week, and got rather a few compliments.

There were many lovely crafters at the fair, and I was not able to escape empty handed. I sat across from Ransom Jelly (website coming over the winter). I bought so much spicy jelly as “presents,” but srsly I’m going to eat all of it myself, it was SO GOOD (apparently peppered jelly is a common Texan thing? Suddenly the prospect of moving there is more exciting). I also bought a lovely piece of jewelry from AbbyJoy. I might wear it with my wedding dress: it’s silver, tactile, and floral (like my ring!), and just lovely, and she was a lovely person as well.

So, I felt successful enough for my first mini-fair. Win!

Aaaaand these were my wares:

the felt creations
the paper creations
the thingadoos

Also a tangle of origami earrings that I made two years ago, that are really just prototypes.

It was quite fun!!

Spry: turtleneck to a zippy hack

A few years ago, my now-betrothed presented to me a red turtleneck. (He went on vacation to Germany, and I asked him to buy me clothes from my favorite German store, anything he thought would suit me. And he brought me back FOUR amazing sweaters. How perfect of a man is that? To actually buy me clothes?? Clearly he is the most perfect man in the world.)  I loved the turtleneck, but didn’t wear as often as I should have, because the neck was a little tight, even for a turtleneck. Slowly I began to envision a hack…

Initially the plan was to turn the sweater into a cardigan. Then I opted to make it a zippered-hoodie type sweater. Then I realized the zipper I got is for cushions, ie it doesn’t come apart at the bottom. So now it’s a… faux-zippy sweater, I suppose.

I measured the sweater from top to bottom, and acquired the appropriate length zipper. I put the sweater on and positioned the zipper appropriately, and marked w/ chalk the line I wanted. (I off-centered it to make it futuristic and chic and edgy and stuff!) Luckily this was a ribbed sweater, so the line was very easy to cut. Next I pinned down the zipper, one side at a time, using lots and lots of pins and patience, and sewed the whole thing up in a relatively straight line. (I’m sure you can also just go ahead and sew on the zipper before you cut the shirt open, and then just cut around the zipper once it’s sewn into place. That would ensure that both sides are more equal. Using a zipper foot on the machine probably would have also helped things in general, except I don’t know how to use that yet. Next time!)

The zipper is khaki/beige. I used a red thread, mainly so you can’t see the stitching on the front, but also to add some contrast to the back, which is visible when the zipper is open.

plain jane turtleneck to versatile asymmetrical zippy

I dare say I’m rather pleased with the result, although I did end up stretching one side longer than the other. I like how now I can wear it still as a functional turtleneck, but also as something a little more fun. I also like that the zipper breaks the sheer redness of the shirt up a little (altho I love red, I know it can be a bit much at times), and adds something interesting.

Spry: sewing paper

I caught a cold/severe sore throat this past weekend and spent most of it in bed or eating ice cream, looking longingly out the window at the gorgeous fall day that was sparkling outside without me.

When the ice cream had fortified me enough, I crafted a little and watched a lot of movies.

One of the things I did was hemmed the postcards for my save-the-dates. Yes, hemmed the postcards.

There are lots of paper-sewing tutorials/examples out there, and I’d been wanting to try it for a while. My betrothed and I are having a tiny wedding, and originally were going to have announcement cards printed… until I realized we’re only inviting about 30 entities (families/couples/singles who will write in their plus-ones, etc). So we decided to totally DIY the cards with what we had on hand, ie cardstock, my sewing machine, and our collaborative drawing skillz.

First I used spray-adhesive to glue two color-coordinated sheets of cardstock together (and people are not kidding when they say you should do this in a well-ventilated area. FYI the bathroom, despite having a vent, is not particularly well-ventilated, and the glue, being aerosol, will travel farther than you think it will, ie make the floor, sink, ETC rather tacky to the touch). After letting them dry overnite, I used our paper cutter to slice them into quarters (USPS regulates that postcards must be at, or under, 4.25inches wide.. which is a close shave for 8.5″ paper).

Then, sew baby sew! (The DIY-Bride book, for it’s sewn programs project suggests putting on “some high octane tunes” to keep momentum going. Although you can’t actually hear the tunes half the time when the sewing machine is going, it is nice to have those bursts of music… especially after I realized I was humming Ben Folds’ latest breakup song to myself, I quickly followed their advice and put on something more fitting.)

feed me!

The first one was a “first pancake” situation and not pretty, but after that, I got the hang of it and it was rather quick work.

color coordinated

I even got fancy and used different colors for the top and bottom threads so they contrasted better with the card colors! I think our color scheme is going to be a variation of pink/yellow and maybe a little blue? For our save-the-dates though, I didn’t have a pink thread that was pleasing to me, so I went for yellow and blue highlights.

all the pretty papers

Now, I send these blank beauties to my hubby-to-be so he can draw on them, and he’ll again send them back to me so I can add finishing touches to them… and then I’ll mail them.

If you’ve never sewn paper, I do indeed recommend it. It’s strangely satisfying, possibly because it’s a brittle medium, that won’t wrinkle or pull or pinch the way most fabrics tend to.

Spry: felty flowers (flower pins part one)

So my office building is having a craft fair in December, so I’ve shayshayed myself into the line up.

This is my big break! Or really, my test run to see if the things I’m planning on offering as wedding favors are favored at all by the general populace.

a veritable garden

Flower pins (ok there’s a heart in there too). This weekend I played with felt, but I also want to play around with other fabrics, as well as paper, and becoming more daring with my use of beads and lace. I suppose these are prototypes in a way, but they’re a strong start? (The wedding is in June, so felt might be too “stuffy” by that time… but for a holiday craft fair, why not?)

Tutorial of I found for rose-like monochromatic puffs, apparently it’s called a box-fold; also, this is actually the first time I’ve made pom-poms. If you haven’t, I certainly recommend it. This is one way of making those four/three petaled flowers I’ve got, but really it’s easier just to cut out the flower whole and pinch in the center than bothering with individual petals.