New Quilt for me – Part III

Here’s the third and final post on my new quilt!

I wanted to do quick, simple quilting on my quilt.  I decided to just do parallel lines on the sashing, using navy thread.  I traced lines approximately 3/4″ from each square – in some cases, I learned, my squares weren’t as well aligned as I thought, so the lines aren’t always exactly parallel to the squares, but they’re close enough.  Again, since this quilt is for me, I wasn’t that concerned.

Here are the traced lines – sorry they aren’t that clear in the picture.

Here are my brand new pins and machine needles, purchased on advice from the ladies on my quilt retreat.

I don’t always quilt closely together, but I read on someone’s quilt blog that the quilting shouldn’t be more than three inches apart for a quilt that will be used a lot, because in time the quilt might start to fall apart.  Just in case, I decided I should at least do some additional quilting.  I spent some time thinking about the best way to quilt the diamonds – since I’d chosen them to highlight the prints, some of which I fussy cut, I didn’t want to obscure the prints by quilting over or through them.  Here are different ideas I thought about:

I finally decided on diamonds quilted inside of them, like below.  For the corners and edges, I traced whatever portion would appear if it were part of a whole diamond.

The diamonds meant I didn’t have to maneuver the quilt too much.  Since this is what my quilt space looks like, I think you can see why I prefer pretty simple designs when machine quilting:

I quilt on the desk from my childhood bedroom set.  It’s not ideal, to say the least.

I quilted the diamonds across diagonal rows.  I rolled up the quilt and began with the center diagonal row, going from the top corner of the quilt to the bottom corner opposite.  Each row got two passes – first quilting one half of each diamond and then quilting the second.  I alternated sides, so if I did the left side of the top diamond, I did the right side of the diamond below it, and back and forth all the way down.  Then I moved to the row to the right, and the row to the right of that, until I was finished with that half of the quilt.  Then I flipped the quilt over and repeated the process with the rows that remained.

I only quilted within each of the squares set on point.  When I got to the bottom, I backstitched, lifted my needle and the foot, and moved to the top point of the square below.  I cut all those threads off at the end.

I was really happy with how the quilting came out.

Here’s the quilting from the back:


I LOVE the back.  I love it more than the front.

I finished the quilt in the beginning of April and since we’ve had another cold snap I’ve actually been able to use it again.

Hunter’s Star Quilt – teaser

I hope everyone had a great weekend!  Mine was lovely.  Unfortunately, I caught a bit of a cold, but since there seems to be something much worse going around, I’m grateful that I’m just tired and sniffly.  I was able to do a lot of work this weekend despite the cold, but I didn’t finish the machine quilting on my Hunter’s Star quilt.  I’ve decided to save the full post for when I’ve made more progress, but here’s a teaser:

Blog tags

I want to make the blog more reader-friendly, and I realized that tags are a good way to do this.  I’ve gone through all of my posts and added tags based on various themes. I’ll tag this post with all of them so you can more easily find anything you’re interested in, and my goal is to be more conscientious about tagging in the future.

In the course of doing all my tags, I realized that I posted twice about the Storm at Sea runner I made my parents, once in 2011 and again last December during my Advent posts.  Perhaps if I’d had a better tagging system I would have remembered that I’d done it before!  It was fun to go back and look at the old posts – I’d forgotten what some of the blocks were called and I had to read the posts to see which quilt I was writing about.  Most of my pre-blog quilts are on here, although I know of at least four that aren’t.  Perhaps those will be fodder for Advent 2014!

The tags fall into several categories: block type, type of item if it’s not a quilt, language if I was quilting in something other than English, etc.   The blocks I have thus far are as follows:

Drunkard’s Path – Storm at Sea – Hunter’s Star – Lone Star – hexagons – pinwheels – Steps to the Altar – Rail Fence -Windowpane – Log Cabin – “Elegance” fan block – Korean patchwork – Amish Square – Bow Tie block

If you happen to notice that I have the wrong name for a block or if there’s another name for it, please let me know!  In one case – the wedding quilt I made for my friend N last year – I’m not sure if there is a name for this kind of quilt.  (https://habibihomemade.wordpress.com/2013/07/16/wedding-quilt-for-n-and-a-part-i/)  If there is a name, please share it with me.

I made a tag for doll quilts, since I make so many of them, and if I used a particular block I tagged that as well.  I may have missed some, so leave a comment if you notice that a block went untagged.

Tags for non-quilts include, in no particular order: pot holders; kitchen/household; holiday; decor; pillows; napkins; clothing; ornaments; aprons.

I’d forgotten how many pillows I’d made, for example.  Kitchen/household covers pot holders, napkins, and aprons; aprons fall under clothing, too.  Decor includes pillows, runners, and wall hangings, but runners and wall hangings don’t have separate tags.  Holiday includes ornaments and stockings, the latter of which also don’t have a separate tag.  If you think it would be helpful for me to make a runners tag or a wall hangings tag or a stockings tag, let me know.  If you see anything I haven’t tagged that you think I should – a quilting design or a specific stitch or whatever – just leave me a comment.

Hopefully this way my blog will be much easier to navigate.  I like to read other quilters’ blogs and I’ve learned not just from what other people are making but from how they’re blogging about it.  Tagging struck me as a relatively easy way to be more accessible.  This is for you, so feel free to give me your input.  If you want a “wedding” tag or a “birthday” tag or some other category that you think would be useful, I want to know about it.

Enjoy!

Hunter’s Star Quilt – Part IV

Happy Easter and happy last day of Passover!  I’m so happy that it’s Easter.  I had a lovely weekend with my family.

Your Easter/Passover/random Tuesday in April present is another post on the Hunter’s Star quilt.

I decided to add a border to the quilt.  I had just enough fabric to make a narrow border in the blue or in the white, or both.  I decided on the blue, which I’m also going to use to bind the quilt.  (I know!  My first time binding a quilt!  I already went to the fabric store and bought another 3/4 of a yard of the navy to use as the binding.)  I cut 2.5″ strips and pieced them diagonally into one long, continuous strip because I decided it was easier to pin the long strip to one edge and cut it at the end, then pin to the next side, etc., as opposed to taking the strips and sewing them together and pre-cutting them into strips of the approximate necessary length.  I sewed the border around the edges.

I had decided on beige for the back, because M told me the colors he liked were blue/white and beige.   I gathered up my beige fabrics with subtle prints to make a pieced back, but as I started piecing it, I thought that it was going to come out to patchwork-y for the quilt.  It’s one thing for a patchwork-y back for a scrappy quilt, and most of my quilts are all full of crazy prints.  However, this quilt top is so beautiful with just the two solid fabrics.  The pattern is complex but the simplicity of the two solids appeals to me and I wanted to carry that over into the back. (That’s why the border is a simple solid border.)  I decided not to use the patchwork for the back. I kept piecing it and I’m going to save it for a charity quilt.  Instead, for the back I’m using a solid beige.  I don’t know where I got this wide beige fabric – did I buy it?  Did it come from my grandmother’s sewing things?  I have no memory of acquiring it – but it’s perfect for the back.  I cut approximately five feet of it, since my quilt top is around 55″.  That turned out to be really easy.  I probably should have just decided on that in the first place.

I cut the binding from the extra fabric I’d bought.  I cut six 3″ strips.  (I know that’s super wide, but it’ll be my first time binding a quilt and I wanted to have plenty of leeway.)  Then I sewed the six strips together, folded the long strip in half and ironed it.  I don’t seem to have taken a picture of it, though, so you’ll have to take my word for it!

I took a couple of days off last week and I spent Good Friday with my mom.  We went to the fabric store near my parents’ house – my mom is converted to quilting now! – and I quickly put M’s quilt together on the ping pong table.  It’s not too big and I safety pinned it, so it went pretty quickly.

I laid out the batting and then put the quilt top on top and rolled it up, but I didn’t take a picture.  Then I laid out the backing and unrolled the batting/top onto it and smoothed everything out.

I trimmed the edges and safety pinned them down.

I have been thinking a lot about how I should quilt it.  I had an idea and then I discarded it, and now I have a new idea.  I’ll be doing some machine quilting and some hand quilting.  I suspect I won’t be posting about it next week unless I get a ton of work done this weekend, but I have plenty of other things to share with you!


Nigerian print

I was rooting through my stash and I found where I’d put the Nigerian print I mentioned in my post yesterday, so I took a quick picture to show you.

The color reads a little bit more yellow in the picture – it’s more of a neon green in person.  I just think it’s such a cool print.  I have another Nigerian print in dark blue and neon green (greener than the shade here), as well.  They’re fabulous.

I’ve had trouble coordinating with this because I don’t buy neon fabrics.  I think you can also see why the teal I bought didn’t work.  The right shade of royal blue or aqua would be amazing, though, right?  I just didn’t have enough of anything.  I think I need to take the fabric to the store with me to match it.  Ordering online is dangerous when it comes to matching shades.

New Quilt for Me – Part II

Happy Passover to those of you who celebrate!  I’m in a celebratory mood myself.  This is going up a day early because on Monday night I will be at my friend A’s house for the seder and I won’t have time to write my post for Tuesday morning.  Then next Sunday is Easter!  I am ready for Lent to be over.  At Palm Sunday mass this weekend I felt joyful and uplifted, ready for Easter to come.

Moving on: This week I’m going to talk about the backing and putting my new quilt together.

I have this amazing fabric that my friend K brought back from Nigeria.  I wanted to use it as the back of my quilt.  It’s a really cool geometric print in black, white, and neon green.    However, it’s too small.  (As I mentioned, I didn’t do a lot of planning when I put the quilt top together and I wasn’t sure what size it would come out to be.)  I went through my stash – which is quite extensive – looking for something that coordinated with it, but it’s a rather difficult print to match.  I don’t own a lot of solid fabrics or any neon green.  I had some blues that looked nice with it but nothing was large enough, even to make a series of borders.  Finally I decided to go to Michael’s for a couple of yards of something solid.  I thought I wanted something teal or some royal blue.  At Michael’s I got a couple of yards of something like royal blue and a couple of yards of teal, and then I picked up a pink/red/navy/teal print just because I thought it was cute (even though I’m not supposed to be buying fabric that’s not for specific projects).

I got home and decided that what I had wanted was aqua, not teal.  Or maybe what I brought home just wasn’t the right shade of teal.  I decided to use the royal blue with the Nigerian fabric, but the more I looked at the pink/red/navy/teal print the more I loved it, and it matched the teal perfectly, so I decided to piece my back out of that and the teal instead.  (I apologize that I don’t have a picture of the Nigerian fabric, but once I decided not to use it I put it back in my stash and it’s buried somewhere in the bottom.  I don’t feel like digging it out for you, but I’m sure I’ll use it in some future project and you’ll see it then.  It’s really an awesome print.  I almost wonder if I should make a whole cloth quilt, which I’ve never done, just because the print by itself is so good – but I should probably challenge myself to make it work with other fabrics.)

Anyway, here are the fabrics I ended up using for the back:

I am really in love with this print.  My roommate J agrees that it’s very “me.”  I want to make curtains out of it and drape it everywhere in the apartment.  I can’t do that so I’ll have to settle for the quilt back instead.  (I have a little bit leftover, but not much.)  From afar and in pictures the rows of navy/teal and pink/red flowers are very clear, but in person they look far less like orderly rows, and I like that better.  I pieced a back using two large bands of teal and a band of the flowers.

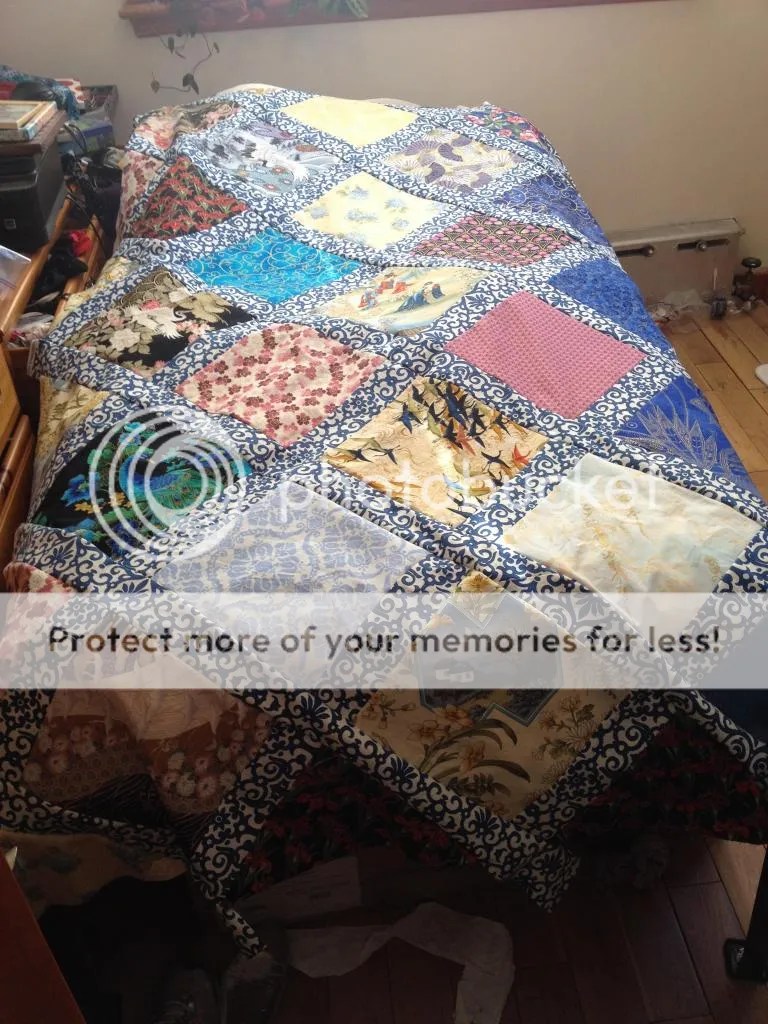
How cool does that look?  I love it.  (This is obviously far too big for the quilt back – I didn’t bother to trim it down until I put my quilt sandwich together.)  Here’s a reminder of what the quilt top looks like:

I photographed these at my parents’ house before I put the sandwich together.  Note the runner I made for them on the coffee table.  Their house is so much better for photographing quilts than mine is.

I had brought large pieces of leftover batting from my apartment, which I basted by hand to use as the batting.  Since it’s a quilt for me, I didn’t care, and I wanted to use them up.  (I didn’t know you could use a large zigzag and do it by machine – next time I’ll do that.)

I read on Elizabeth Hartman’s blog (http://www.ohfransson.com/oh_fransson/) that she likes to lay out her batting, lay her quilt top on top of it, and roll the two layers up from the edges into the center.  Then she lays out her quilt back and puts her rolled up top and batting over it – centered – and unrolls them.  I decided to try it:

I trimmed it first – I just didn’t take a picture of that.

I was VERY pressed for time because Mom and I were leaving for a quilt retreat later that day, so instead of basting I safety pinned it, and it went a lot faster.  I used straight pins to turn the edges under.  Here’s a picture I took after I’d safety pinned and when I was in the process of doing the edges.

I sewed the edges down with navy thread.

Next week (Easter!!) I’ll either post more about the Hunter’s Star quilt or about the quilting on this quilt.  This quilt is now done and I’ve been able to use it a little bit, despite the fact that the heat has still been on in my apartment building.  (I think now that we’ve had two days of 70-degree weather they’ve finally turned it off.)  The Hunter’s Star quilt is still in progress but I’ve actually made some small progress this weekend and I’ll have made more progress by next week – my deadline for myself is to have it done before I go home for Easter so I can put it together on the ping pong table.  (I’ve got a busy week ahead of me getting ready for Easter, but sewing projects are high on my to-do list.)  Work that is in-progress feels more interesting to me than completed projects, and therefore more post-worthy.   On the other hand, I like to do one project at a time in a series of consecutive posts.  So I don’t know how I’ll feel when it comes time to write next week’s post, but it’ll be either the final post about this quilt or the next post about the Hunter’s Star.

Enjoy Passover and/or Holy Week and/or just a plain old week in April!


New Quilt for Me – Part I

A change of pace today: my new quilt.   I haven’t had a ton of time to sew this week so I haven’t been able to work on the Hunter’s Star Quilt, but I’ll be back to that soon.  In the meantime, I’ve been working on my quilt for a while and I’ve made a lot of progress.

I LOVE my Drunkard’s Path bedspread.  It’s so cute.  However, it’s not warm enough for winter, so I decided to make a second quilt for myself.  By the time I finish it, it won’t be winter anymore, but I’ll be done soon.

I thought I would make a window pane quilt with large diamonds, something that would be simple and pleasing to the eye.  I cut out 10″ squares of especially pretty fabrics (of which I have many) and set them on point.  I had an idea of how I wanted them laid out and how many rows of each I wanted, but my math was fuzzy.  I thought I needed 28 squares and 8 triangles (or something like that), but I ended up cutting the squares a little haphazardly as far as numbers went.  I didn’t decide how I wanted everything laid out and which ones I wanted for the triangles until I’d cut them all.   Normally I plan kind of better, but since the quilt is just a nice blanket for me I didn’t worry that much about it.

Here’s my original layout drawing that I didn’t abide by:

Here’s my stack of squares – to be diamonds – and the sashing strips.

You may recognize the sashing fabric from P & J’s wedding present.  https://habibihomemade.wordpress.com/2013/06/18/wedding-quilt-for-p-and-j-part-ii/

I decided to lay out the diamonds in rows – a row of black, a row of cream, and a row of blue, with the rest filling in the gaps in between.  It works pretty well.  I think it looks beautiful just because I used such pretty prints.  Note how many of the Asian-inspired prints there are – those are some of my favorites.  I had some triangles already cut, and then I decided which of the remaining squares to cut.  I tried to arrange them all so that the directional prints were right side up – I had been pretty careful about cutting my squares that way – but you’ll note that a couple of the triangles aren’t quite right side up, including one of the red iris triangles and one of the Asian-inspired prints – the ladies in kimonos on a pale yellow background aren’t quite upright.

I pieced the diamonds in rows on the diagonal.  Of course, I realized that my triangles – since they were cut from the same size as the squares – would actually be a little too small, but since they were on the borders it didn’t matter.  I also realized once I was piecing that the triangles at each corner should have been quarter triangles, not half triangles (if that makes sense) – look how they extend beyond the line.  I ended up cutting off weird sized scraps.  It wasn’t a problem.

Here’s the finished top, minus the border around the edges, which I don’t appear to have photographed at this stage.

Next week I’ll talk about the back and putting the quilt together!


Hunter’s Star Quilt – Part III

Finally, I was ready for the actual piecing!

Each block has one blue square and one white square (the ones I’d set aside – what felt like weeks earlier) and eight half square triangles.  They have to be arranged in a specific layout – they reflect each other.  They look like arrow shafts to me (maybe that’s why it’s called a Hunter’s Star pattern, but probably not).  I found that even with a visual to reference I got mixed up with the layout, so I’d advise anyone trying it to check and double check your layout before you sew.  I only had to rip out a couple of small seams.

As I mentioned last week, I used this tutorial to put my Hunter’s Star quilt together: http://www.cascadequilts.com/2011/02/hunter-star-tutorial.html.  I found it to be really helpful.

I did the half square triangle subsections first. Toward the end, I figured out that it worked best if I laid them out in piles exactly as I was going to sew them, instead of picking two up and trying to match them the way I wanted.  If I laid them out in piles and counted as I did so, I could also guarantee that I was sewing the right number in the right layout.

Once I had all of my subsections sewn and ironed, I put them together with the solid squares.

I sewed the two halves together:

I completed 25 blocks and I had a ton of leftover pieces, including a lot of leftover half square triangles.  I measured my blocks and estimated that they would come out to about 8.5″ each once sewn together, which was also smaller than one I wanted.  I decided to make another 11 blocks so I’d have a six-by-six layout.  That last part went quickly.

I sewed my blocks into rows of six and then sewed the rows together.  I’d laid them out on my couch first to make sure I had them arranged properly.  I was careful not to let them get out of order.

It looks great, right?  J told me it’s her favorite of anything I’ve ever made.

I still have to figure out a border and piece a back for it.