Medallion baby quilt for P and J’s baby – Part III

Hi habibis!  Welcome to part III about the medallion baby quilt I made.  Today I’ll be sharing the pieced back I made and the finished quilt.

Here’s the scrappy back:

I used the leftover rainbow striped fabric from baby N’s quilt, plus a lime green and some butterfly fabric that Anlichan gave me once.  (I don’t think I ever photographed the back of baby N’s quilt – so now you get to see the fabric!)

Here are some shots of the quilting from the back:

I made a scrappy binding in teal and lime – I think you can see it in the pictures.

Here’s the finished quilt:

Medallion baby quilt for P and J’s baby – Part II

Today I want to share with you the machine quilting I did on the medallion baby quilt.

I started with the center of the medallion, the dogwood blossom, and I machine quilted just to the inside of the dogwood blossom shape.  Then I did wavy free motion quilting in the lime green and teal floral border around it, using matching green thread.

For the second border, the one with the rectangles made of triangle scraps, I did straight line quilting in three rows around the inner edge of the border.  I stopped at each corner block, and then in the corners I did three more lines following the inner edge of each corner block.

In the third border, the blue floral print from my Aunt D’s stash, I did more wavy free motion quilting.  At the corners, one line of quilting dipped down into the second border, and the other line dipped out toward the outside edge of the border.

For the fourth border, the one with the pinwheels, I started by quilting the outline of the pinwheels in blue.  Then I traced overlapping half circles in the rest of the border and quilted them, again in blue.

For the fifth border, with the teal and lime solid fabrics, I did an interlocking geometric pattern.

I didn’t quilt the final border.


Mother’s Day Presents: Drawstring Bags

For Mother’s Day I made drawstring bags for my mom and my grandma.  My mom requested aqua, and I used the leftover aqua backing fabric from this quilt.  I have strips of random widths leftover, so I cut four approx. 20″ long strips and sewed them together.  I even pressed my seams open!  I wanted to add a little something special, so I took two of these hearts and machine appliqued them.  I used my satin stitch foot and did a zigzag stitch.  I had a little trouble with puckering – not sure what I’m doing wrong there.

For my grandmother, I used a pretty, soft yellow and blue floral print.  I forgot to take a picture, but she loved it.  (I also forgot to take a picture of my mom’s bag before I gave it to her, but I remembered while I was at home last weekend, which is why this post is so delayed.)

Medallion baby quilt for P and J’s baby – Part I

Hi habibis!  The month of May has been quite busy so far and I never got around to my second post last week, nor will I be participating in the Bloggers Quilt Festival this spring. It’s just too much.  I hope I can make up for it with this bright and cheery baby quilt I made!

My friend P and her husband J just had their first baby!  Baby S is adorable and I was so excited to make her a present.  I decided to use some of the scraps from P and J’s wedding quilt, which are lime and teal, and add some pink and a little orange.  They live in a tropical place and I wanted bright tropical colors.

I mentioned in my Handstitched posts that I’d always wanted to make a medallion quilt, and I started with making the dogwood blossom center for this one, too, in solid teal on a lime and teal print.  (This is the one where I had trouble with the wax paper applique.)  Then I added a border in the same lime and teal print.

For the next border I pulled out my scraps from P and J’s quilt.  It was a hexagon quilt, so I ended up with a lot of little triangles leftover from cutting out the triangles.  I sewed the triangles together in pairs to make little rectangles.  I cut them down to all be the same size and sewed them into strips.  I added a bright print at the corners.

I used a cute print from my Aunt D’s stash with the lime and teal print for the next border.

I had two leftover pinwheel half hexagons from P and J’s quilt, which I used as the centers for the next border, framed by a cherry blossom print and a coordinating coral print from the same set.  (I kept sewing them at the wrong angles and having to rip them out.)

For the fifth border, I used lime and teal solids.

The sixth and final border is strips of orange, yellow, green, and teal.

It’s pretty cool-looking, right?  It’s crazy busy, but my quilts generally are.   I think the center and the first three borders are cohesive, and then the outer three borders are less so, but I like it anyway.


May Bee Block: Circle of Squares

Hi habibis!  I hope anyone who celebrated Mother’s Day had a wonderful day.  I know I did.  I spent the day with my parents and some friends.

I was all set to post about the Mother’s Day presents I made, but I didn’t take pictures.  So I’ll show you my bee block instead!  I made it the first weekend in May – I felt so proactive!

Jan is our queen for Hive 7 this month.  She requested Circle of Squares blocks using this tutorial.   Jan asked for low volume scraps for background fabric and bright, saturated fabrics for the squares, any variations of a single color.   I chose royal blue (is that bright enough? I definitely got the saturated part).  I had fun making the block, and I love the look.

Jan asked us what gets us back in creative mode after we’ve been in a funk.  I think the more I sew the more I want to sew, and seeing all the amazing creative things people do online inspires me when I’m blanking on ideas.


Octopus Baby Quilt – Part IV

Hi habibis!  Welcome to part IV of my octopus baby quilt posts, the last post, covering the quilting.

I put a lot of thought into the quilting.  I wanted to evoke a lot of motion.

I started with the fish.  I quilted a couple of little wavy lines in blue behind each fish’s tail to make it look like the fish was swimming and creating a tiny wake behind itself.

Then the octopus: I quilted three curved lines around the end of each tentacle, again to try to evoke movement.  For the tentacle that’s raised – it’s supposed to be waving hello – I quilted lines to the left and right of the tentacle.  The thread is a dark greenish blue.

I quilted waving lines across the quilt in lighter and darker blue, to mimic the movement of water.  I extended the lines into the borders on the sides and the border at the top.  I varied the thread colors based on the shades of fabric I was covering – the darker thread on the darker fabric and the lighter thread on the lighter fabrics.

Finally, I quilted seaweed at the bottom of the quilt in green thread.  The seaweed also grows out of the bottom of the border up into the empty space around the octopus.  I was pleased with how that turned out.

For the hand quilting, I did the baby’s initials in a blank space.

I was concerned that the area around the octopus wouldn’t hold together enough, so I quilted all the way around the outline, which will hopefully help.  It’s a lot of space to not be quilted, especially in a baby quilt, and I make my quilts to be used.  I hope it’ll hold together.

The binding is scrappy, in yellow, orange, and green.  The yellow and orange echo the fish and are significant colors – meaningful for the baby’s mother and me.  The green, as I think I mentioned before, is the mother’s favorite color.


Octopus Baby Quilt – Part III

Happy May, habibis!  The weather has finally gotten so nice, so lovely here.

Today I want to show you the borders I put on the octopus baby quilt and the pieced back.  I apologize for the lack of pictures – I could have sworn I took more!

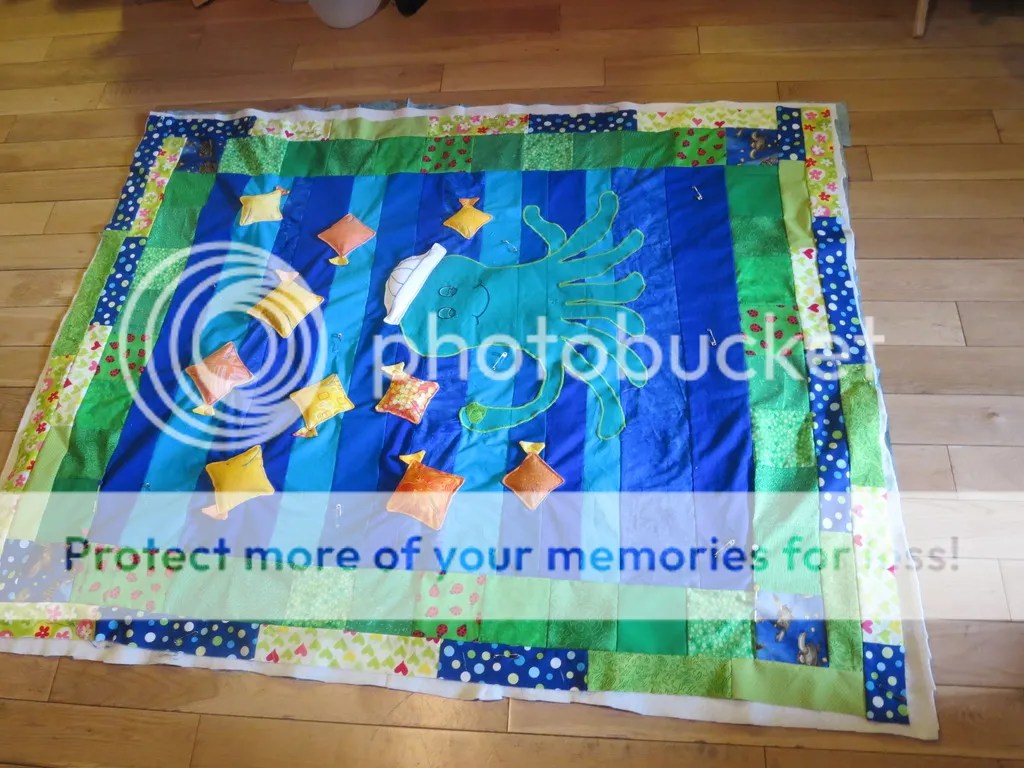
I started with green squares, all in similar values of green, with 4 squares of green turtles on a blue background for the corners.   Then I cut 3″ (2.5″? now I can’t remember) strips of bright green prints with a blue with green polka dots mixed in.  I used those strips to make a narrower border, and then I added an extra row of strips across the top and bottom.  It looks cool, right?

I realized that the quilt warped somewhat when I stuffed the fish and octopus.  I didn’t try to square it up before I added the borders.  When I tried to add the borders, I realized that it wasn’t a perfect rectangle.  My attempts to mitigate that failed.  (Confession: The quilt remains 3″ longer on one side than the other, even now after it’s finished.  Oh well – it still looks cute!)

I pieced the back of the quilt.  I used leftover forest green fabric from the backing from my brother R’s wedding quilt, mixed in with a lighter green flannel.  The flannel print shows old fashioned ships over maps with little pirate flags.

I made a scrappy binding but I can’t find pictures.  Maybe it’ll show up in my pictures of the quilting – check back in tomorrow to see them!